Forgot your password in windows 8. How to easily reset a forgotten password in any version of Windows. Local account and Microsoft account
Due to numerous requests from readers, I decided to write detailed and simple instructions, how to reset a user account password in any version of Windows: 10, 8.1, 8, 7, XP.
So, you turned on the computer, and the system asks you to enter a password to log in. You enter the user's password, but it does not match: the “invalid password” error appears. What to do if no password is suitable, but you need to log in? There is a solution - you can reset the password using a special program recorded on a bootable USB flash drive. Now I’ll tell you how to create such a flash drive. 
You will need to briefly use any others computer. To do this, you can contact a relative, friend, neighbor, maybe you have a computer at work - I think this is not a problem now.
So, we sit down at another computer or laptop. Insert any flash drive into it:

Download a free program for resetting Windows passwords -. You can download it from the official website (or from my Yandex.Disk): 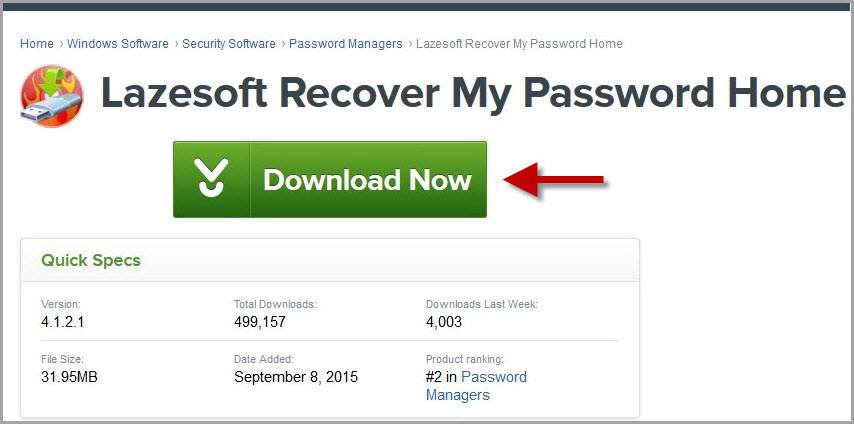
Run the downloaded file lsrmphdsetup.exe:Install the program as usual: i.e. We agree with everything and press the ““ button in all windows. Next" In the last installation window, click the “ Finish” – the program will start automatically and its shortcut will be created on the desktop: 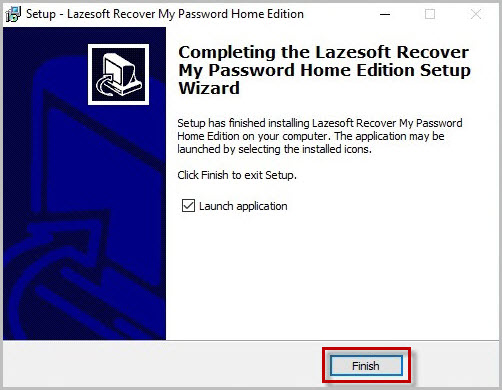
In the start window, click the button Burn Bootable CD/USB Disk Now!(“Burn a bootable CD/USB disk right now”): 
In the next window select Windows version, which is installed on the computer where we will then reset the password. Not on the list Windows 10, but it’s not scary: if you have a “ten”, then choose here Windows 8.1 with your bit depth.
By the way, on one of the forums I saw a message that you can create a bootable USB flash drive with Windows 8.1 64-bit, and it will be suitable for resetting the password on any version of Windows (I checked on Windows 10 64-bit and on Windows 7 64-bit - so and is): 
After you have selected the desired version of Windows, click the “ Next”:

In the next window, place a marker on the item USB Flash and select the letter of our flash drive (it is already inserted into the computer). In my case, the letter of the flash drive: F.
Then press the button “ Start”: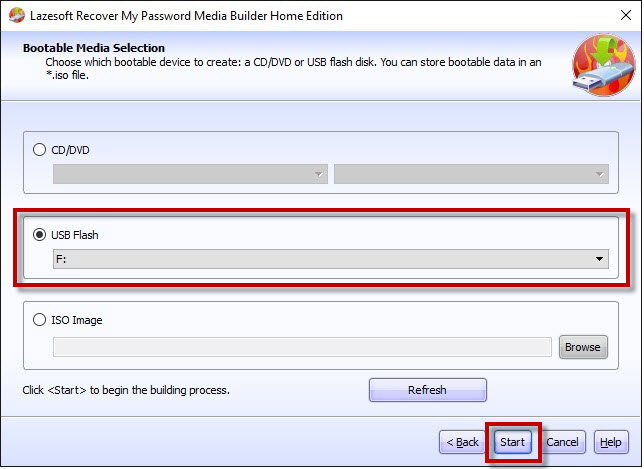
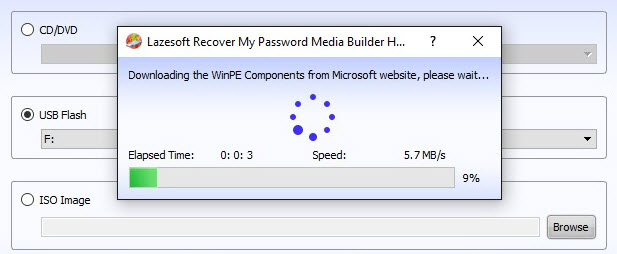
The program will download the necessary components from the Microsoft website for some time:
After this the program will ask: “ Should you format your USB drive now?“All files, if they are on the flash drive, will be deleted. Press the button “ Yes”:
Now we wait until the bootable USB flash drive is created:


At the end of the process, press the button “ Finish”:
 All! The bootable USB flash drive with the password reset program is ready. We take it out and take it to our computer.
Insert the bootable USB flash drive into your computer. And now comes the most important, and at the same time, the most difficult moment for those who will be doing this for the first time. We need configure the computer to boot from our flash drive .
Those who know how to boot a computer from a flash drive can go straight to the end of this article. For those who don’t know how to boot from a flash drive, I’ll try to explain as clearly as possible:
============================================================================================
In order to “force” the computer to boot not as usual (i.e. from the hard drive), but from the device we need (in our case, from a flash drive), we need to enable a certain setting in Bios computer.
To get into this very Bios, we must immediately after turning on the computer press a certain key on the keyboard (and press not just once, but many, many times until we see the BIOS on the screen).
This key is different on different computers and laptops:
- The most commonly used key is Delete(or Del ).
- You can also often call up the BIOS using the key F2(and on some laptops Fn+F2 ).
- Keys are used less frequently Esc, F1, F6 and others.
In general, immediately after you press the Power button on your computer or laptop, do not wait for Windows to start loading, but immediately start pressing the key many times Delete on keyboard. After a few seconds (5-10) you should see Bios.
If nothing like this appears, and your Windows starts loading as usual, then we don’t wait for anything else: we restart our computer again (you can directly use the Reset button) and try pressing another key many times - F2.
If you don’t get into the BIOS again, reboot the computer again and try pressing the next key - Esc. After F6 etc. But hopefully you won't have to experiment for so long: in the vast majority of cases, either the Delete or F2 key works.
By the way, a hint about which key to load the BIOS usually flashes at the bottom of the screen immediately after turning on the computer. But for some reason no one looks at her, or does not have time to look at her.
On different computers Bios different, and it looks different for everyone.
For example, on my computer it looks like this: 
On another computer it will be like this: 
On the third computer it’s like this:  That is, I say this because it is almost impossible to write separate instructions for each Bios.
The main thing that anyone who needs to configure booting from a flash drive should know: in the BIOS (no matter how it looks like for you) you need to find the section where the word is present Boot(from English “Loading”). By using the arrows on the keyboard to navigate to this section, we set it to first place in the list of boot devices flash drive.
In Bios, the flash drive may be displayed with its own name (for example, Transcend), or as USB-HDD; There are other options. One thing is important: it must be selected as the first device from which the computer will boot.
Usually the flash drive is “raised” to first place using the arrows on the keyboard, or the keys +/- , or F5/F6.
Having set the setting we need in Bios, we must leave it, not forgetting to save the changes made. To do this you need to go to the section Exit(it’s usually the last one) – and there select the item “ Save and Exit” (“Save and Exit”). And then confirm once again that we are leaving by clicking “ Yes”.
That's all: if you did everything correctly, the computer will reboot and boot from the flash drive (press the Delete key again, or F2, or something else - no need!).
Many people don’t even want to bother creating a bootable flash drive with any software, because... They are afraid that they still won’t be able to configure the computer to boot from it. I tried to describe this entire process of booting from a flash drive in as much detail as possible. If you have mastered this text, I hope it has become at least a little clearer and now all that remains is to practice.
===============================================================================================================
So, I created a bootable USB flash drive with a password reset program on another computer. I insert this flash drive into my computer and turn it on.
Immediately I press the key many, many times Delete on keyboard. After a few seconds I get into Bios.
Using the arrows on the keyboard, I go to the section Boot(although in my Bios you can work with the mouse - in older versions of Bios this will not work).
Here my first device now is HDD(ACHI PO: WDC WD50...): 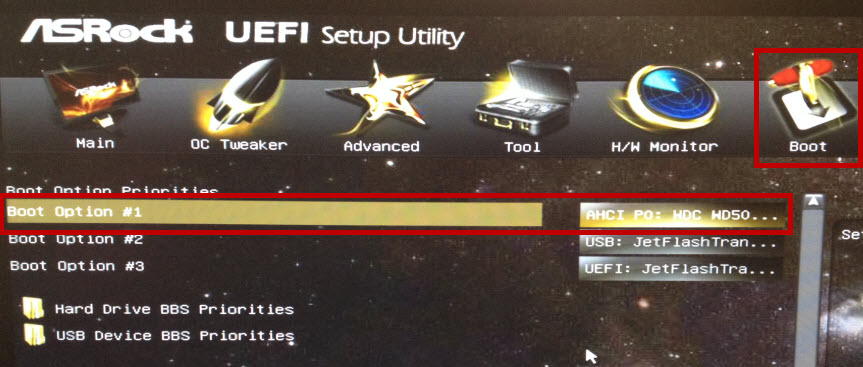 I select this line using the arrow on the keyboard and press the key Enter. A list of devices from which you can boot opens. In my case, this is a hard drive and my flash drive (it is listed here twice). We raise to the first place in the list - flash drive(if there is a choice: USB or UEFI, then choose UEFI). We do this using the arrows on the keyboard or keys +/-
, or F5/F6:
I select this line using the arrow on the keyboard and press the key Enter. A list of devices from which you can boot opens. In my case, this is a hard drive and my flash drive (it is listed here twice). We raise to the first place in the list - flash drive(if there is a choice: USB or UEFI, then choose UEFI). We do this using the arrows on the keyboard or keys +/-
, or F5/F6:
Now the flash drive is in first place in the list of boot devices: 
Now we exit here, saving the changes. To do this, move the arrow on the keyboard to the last section Exit. Select the line Save Changes and Exit- press the key Enter:
Then select Yes:
After a while, a menu opens in which, using the key Enter we select an item Lazesoft Live CD:
Wait while it downloads: 
In the next window, check that the item is selected Reset Windows Password(“Reset Windows Password”) and press the button Next:
A window will pop up with a message about non-commercial use of the program - click Yes:
Click again Next:
In the next window highlight the username, whose password will be reset and click Next:
Click on the button RESET/UNLOCK:
The password has been successfully reset - click OK. Then Finish:
We go to “ Start” and press Reboot Computer("To restart a computer"): 
Click OK:
After the computer restarts, we can login to windows without password!

Article content:
A situation often occurs when, for some reason, the password for a user/administrator account is forgotten or lost. In this article, we'll look at three different ways to reset your password in Windows Vista, 7, 8, or Windows 10: using System Restore, using Windows Setup, and using a third-party program called Offline NT Password and Registry editor.
All methods described below are suitable for operating systems Windows Vista, Windows 7, Windows 8, Windows 8.1 And Windows 10(up to version 1803).
Method using "System Restore"
The essence of the method is as follows - replacing the exe file which is responsible for enabling sticky keys by pressing the Shift button five times. By replacing this file with a command line executable file, you can perform any actions on your computer.
We boot from the disk, select the language we need.


After this, it will begin scanning for the presence of Windows installed on the computer. After completion, a window will appear asking you to select the system to restore.

We remember the drive letter indicated in the “Folder” column (in the screenshot and further in the example it is the letter D). Select the desired operating system and click Next.

In the system recovery options menu, select the last item “Command Prompt”.
At the command line, enter the following commands (remembering to replace the letter D with your desired one):
We make a backup copy of the program for sticky keys:
Copy D:\Windows\system32\sethc.exe D:\backup
Now we replace the file of this program with a command line file:
Copy D:\Windows\system32\cmd.exe D:\Windows\system32\sethc.exe /Y

Restart your computer and boot into your operating system.
After the system boots, press the Shift button five times, after which the command line should start. If this does not happen, most likely you did something wrong in the previous part of the instructions.
Now enter the following command on the command line:
Net user<имя пользователя> <новый пароль>
of course replacing<имя пользователя>And<новый пароль>to the ones you need.

If you are unable to change the password for the Administrator user, also try usernames such as Admin and Administrator.
Method using Windows installation
Boot from the Windows installation disk. We are waiting for the download, after which right in the first menu with the choice of the desired language, press the Shift + F10 buttons. A command line will open, in which we enter the regedit command.

Select the HKEY_LOCAL_MACHINE section, in the registry editor menu click File - Load hive.

We need to find the SAM file, which is on the disk with your operating system, in the Windows\System32\config folder.

When prompted to enter a section name, enter any name.

Now open the section HKEY_LOCAL_MACHINE\name under which you saved the hive\SAM\Domains\Account\Users\000001F4.

There we find the key F, open it and in line number 38 change the first value from 11 to 10. 

Now select your hive in HKEY_LOCAL_MACHINE and select Unload Hive from the File menu.

To confirm the unloading of the bush, we answer “Yes”.
We reboot and see that the previously hidden user Administrator has appeared in the list of users.

Now we can log in under it, and using the Control Panel - User Management, change any user’s password to any desired one, or delete it altogether.
Method using the Offline NT Password and Registry editor program
We go to, and in the Download section we download the image to burn to disk or files for a USB drive (flash drive, external hard drive).
We start the computer from the device where you recorded the program. The program will launch and prompt you to select download options.

Since everything is usually fine by default, we don’t touch anything and press Enter.

Select the desired section with a number and press Enter.
Perhaps, if you turned off your computer incorrectly, you will see this message (if there is no such thing, then feel free to skip this point):
 It says that the computer was turned off incorrectly, and it is possible that if you continue, some recent changes to the system will be lost, and it is highly recommended that you restart the computer, wait until Windows does a disk check, and then reboot again into Offline NT Password and Registry. If you don't want to take any risks, press n and Enter. After this, the program will inform you that you can repeat everything again, but since we need to restart the computer, we just press n again, and then Enter. Now we restart our computer and check the disk.
Now let's return to the normal course of events.
In the next window, the program asks you to indicate which part of the registry it should load:

By default, we are happy with everything, press Enter.

Now the program will offer us several options for action - we need the very first one, to display and edit the list of users, the program itself offers it to us by default, so just press Enter again.
Now we have a list of users, and as you can see, Russian letters are not displayed there. The program requires you to enter the user's RID, which is displayed in the first column of the table.

Enter it and press Enter.
In the next menu we will be asked to carry out various manipulations with the user, but we are only interested in point 1 - deleting the user password. Press 1, then Enter.
The same menu will pop up, but this does not mean that something went wrong. We are looking for the Password cleared line. If it is there, then the password has been reset successfully, and now you need to press the following keys - q, Enter, q, Enter. y, Enter, n, Enter. Afterwards, you can restart the computer and if everything above was done correctly, then the desired user will not have a password.
But then a problem happened - the owner forgot the administrator’s access code and when he tried to log in, he saw a message about the incorrectly entered password and the impossibility of logging into the system. The situation is further aggravated by the fact that Windows stores all passwords in a securely protected partition on the hard drive using the SAM system. For security reasons, accessing it and finding out the password is not as easy as it might seem at first glance. On the one hand, this will protect you from third-party interference, but, on the other hand, it greatly ruins your life if you forget the access combination. Users of Windows 7 suffer the most, since this version of the OS only offers work with a local account, unlike the newer Windows 8, 8.1 and 10. Here the user can attach a Microsoft account to the computer and, in case of a forgotten password, can reset it via website from any device. PC owners on seven can only remove the administrator password.
Fortunately, everything is not as scary as it might seem at first glance. If you follow our detailed instructions on how to reset the Windows 7 administrator password when using a local account, as well as how to find out the password, you can easily solve your problem in a short time without outside help. So let's get started.

Method 1. Using an installation disk or recovery image
To do this, you will need a boot disk or flash drive with Windows, or a previously created recovery disk (this can also be a flash drive). If you may not be able to figure out the second one, since you are unlikely to constantly create fresh recovery disks, then the installation image can be downloaded from a large number of sites.
- Insert the disk or flash drive into the PC, and in the BIOS, mark the media as a priority when booting. This is necessary so that loading occurs from external media, and not from the built-in hard drive.
- Depending on the version of Windows, click Diagnostics - Advanced options - Command Prompt or System Restore - Next - Command Prompt.
- When the command prompt opens, add regedit and press Enter.
- Click on the HKEY_LOCAL_MACHINE section to highlight it, then click File - Load Hive.
- In the window that opens, go to C:\Windows\System32\config (if the system is installed in a different partition, the address will be slightly different) and open the System.
- Name the loading partition any name, for example, 555.
- In the registry editor, look in the HKEY_LOCAL_MACHINE\555\Setup section and find the CmdLine and SetupType parameters there. Double-click on each of them and change the indicators to the following:
- CmdLine - cmd.exe.
- SetupType - 0 change to 2.
- Select the 555 partition you created, then click File - Unload Hive.
- Take out the flash drive or disk, close all active utilities, select “Reboot” in the main window of the recovery wizard.

After restarting, when you log in, the command line will be expanded. With its help we will perform further operations.
Password reset
To reset your password, use this command:
net user login password
This command is relevant if you remember the exact spelling of the username. If you forgot, type the command net user, after which all accounts saved on the PC will be displayed.
Create a new account
If you do not have any administrator account installed, you will need to create one by entering a few commands. To do this, enter them one by one on the command line:
net user login password /add
net localgroup Administrators login /add
net localgroup Users login /delete
The first command first creates a new account, then assigns it to the administrators group, and then removes it from the users group. After applying all the commands, close the Command Prompt.

By creating a new account with a new password, you will be able to log into Windows without any problems.
Note! You won’t be able to find out your password this way, you can only reset it!
Method 2. Using third-party utilities
Offline NT Password Editor
If the first method involved using standard Windows capabilities, then the second suggests using third-party utilities that allow you to reset the Windows 7 administrator password. One of the most acceptable is Offline NT Password Editor, which allows you to gain full access to the OS system partition. You can either remove or change the password, or activate the administrator account. The utility does not provide a graphical interface, but nevertheless it is not at all difficult to understand. Each step is numbered and indicates what you need to do. So, what are the steps you need to follow to reset your password using this utility?
- On another computer or laptop, go to the developer’s website, in the Bootdisk section, scroll to Download and download the version you need. The file name consists of numbers and letters. If you want to create a boot disk, download the file with cd in the name, but if you use a flash drive, then usb.
- If you are using a disk, write the downloaded image using a burning program, and if using a flash drive, then perform the following manipulations:
- Copy the contents of the archive to a USB flash drive without creating any additional files.
- Expand Command Prompt as Administrator.
- Use the command f:\syslinux.exe -ma f:, where instead of f write the letter under which the flash drive is identified in Windows Explorer. If it doesn’t give any error, it means everything was recorded as expected.
- Insert your external media into the computer, set it in the BIOS as the first one to boot, and turn on the computer. The utility interface should start instead of the Windows Welcome window.

Step 1
The first step is to select the hard drive partition on which Windows is installed. The program provides a list of disk partitions indicating their size, which is what you should focus on. If you remember that the system is usually installed on drive C, which is several times smaller than drive D, it will be quite difficult to make a mistake. Enter the numbers with the section number and press the Enter button.
Step 2
After this, the utility asks which part of the registry needs to be loaded. Select 1 - Password reset, press the corresponding number and confirm with Enter.
Step 3
Changing or resetting a password by editing user data in the registry. The utility will launch chntpw Main Interactive Menu, in which item 1 - Edit user data and passwords - is immediately selected. Confirm your selection by pressing the Enter button. If you need to change the password, select 2 - Edit (set new) user password.
In the menu that opens, chntpw Edit User Info & Passwords, all computer accounts are displayed, with their code designation in hexadecimal notation (RID column). We are interested in the administrator account; most often it is displayed first in the list and is selected by default. If the account name is displayed in English letters, type it in the input field under the table; if in Russian, then use the information from the RID column. The entry in the input field will be in the format 0xABCD, where instead of ABCD you need to put the value from the table. The selection is confirmed with the Enter button.
Next, the User Edit Menu is displayed with a list of actions that can be performed with the administrator account. Select 1 - Clear (blank) user password and confirm with Enter. The program should report a successful password reset.
Step 4
Saving the changes made (Step Four: Writing back changes). Press successively! and q to exit the previous menus, after which the utility will offer to save the changes by issuing the request “About to write file(s) back! Do it? Enter y, and at the next prompt type n.
To reboot, enter the command reboot or click on the small button on the computer system unit. The system will start you up without asking for a password. You can install it yourself in the account management menu.
ERD Commander
Another fairly advanced utility for resetting the Windows administrator password. First, you will need to create a bootable USB flash drive with the utility on your work computer. For this:
- Prepare a flash drive with a capacity of at least 1 GB, and also download the following four files: HPUSBDISK.zip, Ghost32.exe, Grub4dos.zip, ERD Commander image file in gho format.
- Insert the flash drive into the computer, then run HPUSBdisk.exe, select your drive in the Device window, select File system as FAT32, and then click the Start button. The flash drive will be formatted, so make sure you save the important information stored on it somewhere.
- Unpack the Grub4dos.zip archive and run grubinst_gui.exe, then select the flash drive in the Disk field and click the Install button at the very bottom. If the procedure completes successfully, you should see the following message: “The Mbr/bs has been successfully installed. Press to continue..." Now you can safely move on to the next stage.
- Run Ghost32.exe - click Ok - Local - Disk - From Image, then select the ERD.gho file and click on it.
- In the window that opens, select the flash drive, click Ok - Ok - Yes and wait until the bootable flash drive is completely created. This usually takes 10–15 minutes.

Now you have to work with the ERD Commander bootable flash drive. Here's what to do:
- After connecting the flash drive to the computer, set the boot priority through the BIOS so that the flash drive comes first, and turn on the PC.
- Select your version of Windows. If you confuse the system bit size, then it’s okay, just at the next stage the utility will give an error and you can repeat the procedure from the beginning.
- After waiting for the download, select the installed operating system, click Next - Microsoft Diagnostics - Password Change Wizard.
- You will see a window with a list of users and fields for entering a password. Select the administrator account, write down the new password and confirm it.
- Remove the flash drive from the USB connector, boot into normal mode and use the new password.
Note! You won’t be able to find out your password this way, you can only delete it or set a new one!
Method 3. Substitution of system files
You've probably heard about the sticky keys feature. Simply press the Shift button 5 times quickly and a window will appear asking you to activate the mode. The file sethc.exe, located in the Windows system partition, is responsible for it. Interestingly, you can even activate it in the password entry window when Windows starts. But since the situation is that the user has forgotten it, we need to replace it with the cmd.exe file, which is responsible for opening the command prompt. How to do it?
- Boot from external Windows media, in the installation window, click System Restore - Command Prompt.
- Apply the following commands sequentially:
- copy c:\windows\system32\sethc.exe c:\- to create a backup copy of the sethc.exe utility.
- copy c:\windows\system32\cmd.exe c:\windows\system32\sethc.exe- to replace the file sethc.exe with cmd.exe.
- Restart your computer normally.
- When the password window appears, press the Shift button five times, which will open the Command Prompt.
- To change your password, type the command net user login password, after which reboot again and now you will definitely be able to get into the system.

Note! You will not be able to find out the password this way, only delete it!
How to find out your account password
In this paragraph, we will learn how to hack the administrator password or simply find out it. Indeed, in many cases it is simply easier not to reset the password, but to simply assume that it is forgotten. To do this, we need the Ophcrack utility, which has the capabilities we need. It is capable of working in a graphical and text interface and, according to the creators, is able to find out almost any password stored on your system. How to use it?
- Go to the official website and download the appropriate version: in the form of a program installation file if you can log into the system, or a Live CD to create bootable media if you can’t log into the system because you forgot your password.
- Run the installation file or boot from a flash drive or disk and select the graphical or text interface of the utility.
- Wait until the utility reads and displays the system passwords. Depending on the power of the computer, this may take different times.

That's all. As you can see, there is nothing complicated and if your password is not too complex, then the program will help you find it. You will then be able to log in again and enter your access code. Practice shows that if the password is very complex, consisting of a combination of large and small letters, as well as numbers, then the program may not cope.
Conclusion
We hope that our instructions helped you in a situation where you forgot your Windows account password. You now know how to reset it and install a new one. If you still have questions, ask them in the comments.
Forgotten Windows account password is very frustrating and annoying, especially when you urgently need to do some work on your computer or copy files. Fortunately, there are several simple ways to reset or restore it. Below are step-by-step instructions that will help you quickly and without losing information to log into a local user or administrator account by resetting or recovering your password on Windows 8.
In what cases may you need to recover your Windows 8 password?
There may be several reasons:
- computer hacking, unauthorized access, password change by unauthorized persons;
- change PC user;
- creating a password in a different language layout or with the Caps Lock key pressed;
- and, probably, the most common case is when the user simply forgets his password.
Account Types
There are two types of accounts available in Windows 8:
- Local, it, in turn, implies an administrator and a user.
- Microsoft account.
Accordingly, the methods for recovering passwords will differ.
Recover/reset Windows 8 password on a computer, laptop and tablet
To reset or recover your password, you do not need to reinstall the system. There are less radical methods; it is only important to follow the sequence of actions, and very soon you will have access to a computer.
To your Microsoft account
- Follow the link: https://account.live.com/PW.
- A password recovery form will appear on the page. Select “I don’t remember my password” and click “Next”.
- Fill out the e-mail used as your Microsoft account and the captcha (a security code used to confirm that you are a human and not a robot).
Fill out your email and captcha
- From the proposed options, select a method for obtaining a security code. If you indicated a third, please include a phone number or email address so that a support specialist can contact you. Be prepared to be asked for individual information provided in your profile.
Select a method to receive a security code
- In the form, enter the current security code received from the security service and click the “Next” button.
- After completing the steps, the old password will be reset; in the account login window that appears, you need to fill in a new one.
After completing the steps, you can log in to your account using the new password.
Please note that you can reset the password only if the computer is connected to the Internet, otherwise the system will request the old credentials.
Changing the local user password
In Windows 7/XP, you can reset any other user's password easily and quickly when you log in as an administrator. This is no exception for Windows 8.

How to reset your password when rebooting while holding down the "Shift" key
This method is also quite simple and does not require special skills.
- After an unsuccessful authorization attempt, click the “OK” button.
- Hold down the Shift key, click on the shutdown button in the lower right corner and select “Restart” from the list.
Restart your PC while holding down the Shift key
- After this, the system will prompt you to choose an action. Click "Diagnostics".
Select “Diagnostics”
- Then “Return to original state”.
Select “Restore to original state”
- In the next window, click the “Return to original state” button.
Click “Restore to original state”
- The computer will begin returning to its original state.
The process of returning the computer to its original state will begin.
- In the next window, you need to check the box “I accept the terms of the Windows license.” Click the “Accept” button.
Accept the license terms
- Fill in the computer name and click “Next”.
If necessary, configure settings, fill in the computer name
- In the settings window, click “Configure”.
Click the “Configure” button
- Select the “Sign in without a Microsoft account” option.
Choose a sign-in method without using a Microsoft account
- Next - “Local account”.
Then click the “Local Account” button
- The computer setup steps will begin, they may take a few minutes, and once completed, you will be able to log into the OS.
Video: resetting Windows 8 password
Via the command line using a flash drive or disk
Here you need to be patient, as this is a long process, and besides, a preparatory stage will be required.
- Immediately connect the USB flash drive to the computer. All important information from it should be saved, because the system will format the drive. Go to “Control Panel” - “Recovery”, select “Create a recovery disk”.
Select "Create a recovery disk"
- Then click the “Yes” button in the service window.
Click the “Yes” button
- In the next window, uncheck the box, if it is active, click “Next”.
Uncheck the item if it is active
- From the list of devices proposed by the system, select where you want to save the recovery file. Click "Next".
- A warning about formatting the flash drive will appear. Click the “Create” button.
Click the “Create” button
- The process of creating a recovery disk will begin; upon completion, click “Finish”.
- On the computer where you want to reset the password, run , and select boot from a USB drive.
- Go to the menu “Diagnostics” - “Advanced options” - “Command line”.
Select the menu “Diagnostics” - “Advanced options” - “Command line”
- Go to the drive containing the system files: cd D:windows\system32 (case is not important).
- Then create copies of the files: D:Windowssystem32copy cmd.exe cmd.exe.original and D:Windowssystem32copy utilman.exe utilman.exe.original.
Create copies of cmd.exe and utilman.exe files
- Next, delete the utilman file: D:Windowssystem32delutilman.exe.
- Run the command: D:Windowssystem32ren cmd.exe utilman.exe.
- Restart your computer by typing in the command line: D:Windowssystem32shutdown -r -t 00.
- After reboot, click on the “Accessibility” button in the lower left corner. In the command line that opens, type the following command: D:Windowssystem32net user [username]*. Then fill in a new password and confirm it. Be careful: the text will not be displayed.
Click the "Accessibility" button
- Close the command line, log in, filling in the new password.
Of course, it is better to make a recovery flash drive in advance so that it is at hand at the right time. If you still haven’t created it, a second computer will help.
Video: restoring access via the command line
The standard way is “Windows 8 Forgotten Password Wizard”
For many users, the password recovery procedure is a serious problem. For this case, Windows developers have a solution - the Forgotten Password Wizard program.
- Go to “Control Panel”, select “User Accounts”.
In the “Control Panel”, select “User Accounts”
- Then, in the menu on the left, select “Create a password reset disk” (the USB drive must already be connected to the computer).
After finishing recording, click “Done”
- After completing the steps, the file userkey.psw will be written to the flash drive
- When logging into your account, log in without a password or enter the wrong password. The system will report an error, and a “Reset password” button will appear below the input field.
- After clicking, the “Password Reset Wizard” will start, connect the flash drive with the previously recorded file and click “Next”.
- Then fill in the fields twice with the new password and hint, click “Next”. The system will reset your old password and you will be able to log in with a new one.
The method only works with a local account; it is recommended to burn the disc in advance, and for each account there is one.
Using software utilities
Another equally popular tool with which you can recover your Windows 8 password is special utilities. There are quite a lot of them, we will describe the procedure for the Reset Windows Password Utility program.
Select the user whose password you want to recover
In addition to Reset Windows Password Utility, you can use the following utilities to recover or reset your password:
- Ophcrack;
- PCUnlocker;
- Windows Password Recovery;
- Lazesoft Recovery Suite.
The password recovery methods proposed above work not only on a computer, but also on a laptop and tablet. And finally: in order to avoid wasting time on eliminating such annoying troubles, we recommend using a combination as a password that you can easily remember.
The question of how to remove a password in Windows 8 is popular among users of the new operating system. True, they ask it in two contexts at once: how to remove the password prompt for logging into the system and how to remove the password altogether if you have forgotten it.
In this instruction, we will consider both options at once in the order listed above. The second case will describe both resetting the Microsoft account password and the local Windows 8 user account.
First of all, keep in mind that in Windows 8 and 8.1 there are two types of accounts - local and Microsoft LiveID account. At the same time, logging into the system can be done using either one or the second. Resetting the password in the two cases will be different.
How to reset your Microsoft account password
If you log in using a Microsoft account, i.e. Your email address is used as a login (it is displayed on the login window under your name), do the following:

That's all. Now, to log into Windows 8, you can use the password you just set. One detail: the computer must be connected to the Internet. If the computer does not have a connection immediately after turning it on, then it will still use the old password and you will have to use other methods to reset it.
How to Remove Windows 8 Local Account Password
In order to use this method, you will need an installation disk or bootable USB flash drive with Windows 8 or Windows 8.1. You can also use a recovery disk for these purposes, which can be created on another computer where you have access to Windows 8 (just enter “Recovery disk” in the search, and then follow the instructions). You use this method at your own risk and is not recommended by Microsoft.

Notes: If you don't know the username for the above command, then just type the command netuser. A list of all usernames will be displayed. Error 8646 when executing these commands indicates that the computer is not using a local account, but the Microsoft account mentioned above.
Something else
Doing all of the above to remove the Windows 8 password will be much easier if you create a USB flash drive to reset the password in advance. Just search for “Create a password reset disk” on the Start screen and make one. It is quite possible that it will come in handy.