How to connect more. How to connect a second computer to the Internet. Creating a Wired Connection
So, you have finally concluded an agreement with a new provider, and a cable with a plug has been installed in your apartment - a real window to the world. All you have to do is connect it to your computer - and the Internet is at your service. However, if it was enough to insert the plug into the socket, you would not need to read this article.
Let's look at how to connect the Internet to a computer via cable, in the simplest case. Let's say you have only one computer, and you will use it as a router (if you suddenly need it or a tablet). Or (alternatively) you are planning to do so later, so you turn off the router to make remote access easier.
Let's say you have a network card on your computer (it doesn't matter whether it's separate or built into the motherboard), and you've just connected an Ethernet cable to its input. We assume that you are using the most current Windows 10. Although for the correct settings of Windows 8/8.1 or even 7, these instructions are also suitable: the principle is the same.
Of course, you can always call a professional to do all the necessary work for you. But specialists are not always free. In addition, you will not only save money on calls on your own, but also learn how to set up the Internet on your computer via cable. In our world, such knowledge can come in handy at any time.
Dynamics vs. Statics
Now check with your provider what kind of connection they offer on your tariff plan: dynamic or static.
With dynamic connection your IP address may change depending on your ISP settings (and if you intend to subsequently connect to your workplace remotely, this may interfere with you). But manipulations with entering parameters are reduced to a minimum: the provider sets the IP address, subnet mask and default gateway independently. In this case, just plug the cable into the computer and that’s it, Internet access will appear.
Static connection provides a static IP address assigned to your computer (or router, if you choose to connect through one). In this case, you will have to manually enter the IP address, subnet mask and default gateway in the connection settings. Usually all these incomprehensible numbers and letters are included in the access agreement or in an appendix to it. If necessary, you can clarify them with the technical support service by providing your details.
In some cases, access also requires a login and password (do not confuse Internet access as such with access to your personal account on the provider’s website - data is required for your personal account).
How is the connection made?
Let's look at the procedure step by step.
- Insert the plug of the Ethernet cable brought into the apartment into the corresponding port of the computer. Even if you have never done this before, you will not be able to confuse this type of connector and plug with something else.

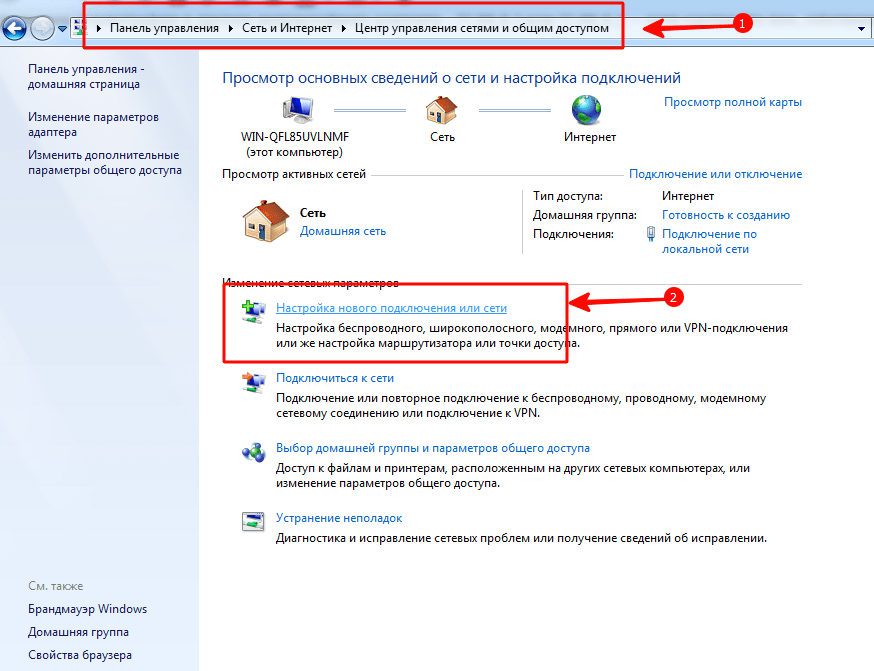
- Right-click on the “Start” button and find the “Control Panel - Network and Internet - Network and Sharing Center” section. In the left column, select the “change adapter settings” tab. A list of your adapters will appear in the main window (more precisely, in our case, one “Local Area Connection” adapter). Again, use the signature “right-click” technique and select “Properties”.

- A small pop-up window contains a whole column of different strings with properties. Select the line “IP version 4 (TCP/IPv4)”. While it's selected, click the Properties button below the list box.

Now our instructions branch out. Have you checked with your provider what IP is provided to you? If not, check now.
- If dynamic, then trust the automatic selection in the IP address and DNS server settings.
- If it is static, you will have to enter the values manually. As a rule, you need to specify “IP address”, “Subnet mask”, “Default gateway” and “DNS server”. When you have completed entering your data, click OK to save your selection.
Important points:
- If the connection requires a modem, enter its default address as the IP address; this is usually 192.168.1.1. If the modem has a different IP (which is rare), it is indicated on the bottom of the modem itself or in its instructions.
- Usually the ISP provides the DNS server details, but sometimes this is omitted. Then you can use the universal ones:
1) Public DNS from Google: 8.8.8.8 or 8.8.4.4 - a universal solution, usually suitable for all computers
2) OpenDNS – 208.67.220.220 and 208.67.222.222
3) Yandex DNS with its own anti-virus filter - 77.88.88.88 or 77.88.8.2 - if you trust the Yandex anti-virus policy (although sometimes it may consider a completely decent site unreliable)
4) Yandex DNS with a filter for pornography and other obscene content - 77.88.8.7 or 77.88.8.3 - although it depends on what you actually need from the Internet, hehe.
- Let us repeat: if remote access is important to you, make sure that your provider’s support ensures that your IP will not change.
If your ISP offers L2TP access, this may require some additional steps on your part. Usually the provider provides instructions for setting up this specific type of connection, but it wouldn’t hurt to duplicate it on our part either.
So, to configure L2TP, you need:
- Go to the already known section “Network and Sharing Center” and select creating a new connection
- Unlike previous options, here you should go to “Connect to your workplace”
- When the system prompts you to create a new connection, select this item
- Select "Use my connection"
- Enter the server address provided by your provider. You should not select the immediate connection option. You assign a name that you like.
- In the next window, enter the username and password provided to you. Don't forget to check the box next to "Remember password"
- Connect now when the system prompts you to do so
- Return to “Adapter Properties” (as discussed above) and select the “Security” section
- In the VPN Type drop-down options, select L2TP IPsec VPN. Below is the line “Data Encryption”, here you need to select “Optional”
- Under the “VPN Type” line, click the “Advanced Options” button
- Enter this same key in the “Key” field. You must have it from your provider.
- That’s it, you can click “OK” with peace of mind and use the connection.
This instruction works for Windows 7 and newer versions.
Why all this complexity? - you ask. This solution has advantages: for you - increased connection security (compared to a regular LAN), for the provider - simplification of the billing system.
Setting up PPPoE
Before setting up the Internet on your computer, check with your provider about the type of access it offers. Access via PPPoE requires not only correct settings, but also authorization using a login and password. You will need this connection method if you do not use a modem or router, but insert the cable from the provider directly into the connector on the computer, without intermediaries.
To do this, you again go to the “Network Control Center” and select there, create a new connection with its help.
In the wizard that launches, you select the first item - “Connect to the Internet” - and click “Next”. Then in the window that appears, you must select “High Speed (with PPPoE)”.
The final step remains. In the final window, you need to come up with a name for the connection and enter the login and password issued by the provider. If your computer is used by several people (for example, family members), each under their own account, and you want to give them all access, then check the box “Allow other accounts to use this connection.”
Now make sure your Internet connection is working. And if so, then hello world!
Today we will deal with the question of how to set up the Internet on a computer or laptop. As a rule, the Internet is set up by an employee of the provider at the moment when you enter into an agreement with him for the provision of services - after all, correct access to the World Wide Web is an indicator of the completion of this service. However, later, when reinstalling Windows or buying a new computer, the Internet settings may go wrong, and here we will be faced with a dilemma - call technical support or do everything ourselves. In fact, this task is not at all difficult, so by reading this article to the end, you can save money more than once.
How to set up Internet on a computer via cable?
The most common type of connection is cable - a wire with a special LAN connector at the end is pulled into your apartment, which is inserted into the network card in the PC case. However, depending on the provider, there are several types of network connections. How to properly set up the Internet and in what way the connection to the World Wide Web occurs should be indicated in the contract papers that were given to you when the employee initially set up the Internet. There are several of them - automatic IP, static IP, PPPoE, L2TP, with filtering by MAC address. Let's look at them in order.
Internet setup automatically
I called this type automatic, because if your provider connects you using this type, then you are lucky - you don’t have to configure anything at all. With it, the network happens “by itself” - that is, we just plug in an Ethernet cable and use the Internet. If it doesn’t work, then make sure that all configurations are reset - to do this, go to “Start > Control Panel > Network and Internet > Network and Sharing Center > Manage network connections > Change adapter settings”, right-click on “ Local Area Connection” and go to “Properties > Internet Protocol version TCP/IP v.4”. Here all values should be set to “Automatic”, as in the picture
Connecting to the Internet on a computer with authorization
In this fairly common type, or rather types, because there are two of them, you will have to work a little and manually create a connection and enter your username and password to set up an Internet connection. If every time you access the Internet, you click on the desktop icon, a connection window opens in which you click on a button - this is your case.

PPPoE
PPPoE – connection to the provider’s servers occurs only using a login and password. If you suddenly reinstalled Windows, then to restore the ability to log out, do the following:
- Go to “Start > Control Panel”

- further in “Networks and Internet”

- and in “Network and Sharing Center”

- Here somewhere on the page (in the left column for Windows 7 or in the main window in Windows 8 and 10) we see the menu item “Set up a connection or network” - click on it

- Here we select “Connect to the Internet” and click “Next”

- Select “High-speed (PPPoE)” and move on

- We enter the login and password issued by the provider - they are usually specified in the contract.

- After this, we return to the “Network Center” and find the “Change adapter settings” link in the menu - click on it.

- We find “High-speed connection” - now it is in the “Disabled” state.

- Double-click on it and a login window will open. Click the “Connect” button and rejoice! For convenience, this “High-speed connection” can be dragged with the mouse to the “Desktop”, creating an icon with a quick link.

L2TP
L2TP is another type of Internet setup with authorization. To activate it, we do everything the same as in the previous method, up to and including step No. 4.

Connecting a laptop to the Internet with a static IP
The next type will not ask you to enter your login and password and click on the icons to connect each time, but it does require manually entering the IP address settings to connect to the provider’s equipment. For settings, we go through the chain “Start > Control Panel > Network and Internet > Network and Sharing Center > Manage network connections > Change adapter settings”, right-click on “Local Area Connection” and go to “Properties > Protocol Internet version TCP/IP v.4”.
And enter into the IP address and DNS server fields the values provided by the provider.

Filtering by MAC address
And finally, the provider can apply filtering by MAC address to any of the above types. This means that you can connect to the Internet only on the computer that is registered with the provider. Insert the cable into another one and the Internet will disappear. This problem usually appears at the moment when you bought a new computer (or network card), brought it home, but the Internet does not work. To be honest, I don’t even understand why some of our “friends” do such garbage, but if this is the case, then you can only activate network access by calling the support service and saying that you bought a new PC.
That’s all for today - I’m sure that you now know exactly how to connect the Internet to your computer and can 100% do it yourself!
In this video we'll talk about the twisted pair (RJ45) crimping circuit. But, the purpose of this video is not just to tell you how to crimp a twisted pair cable, but how to crimp a network cable so that two network devices can be connected to one cable!
First I would like to say that I will consider the implementation of this system for 3 situations:
This is used at home when the network cable is connected directly between the computer and the router. We will connect a second computer or network device to the same cable.
A network in a small office, when the computer is connected to a network outlet, and from the outlet the cable is connected directly to the switch. In this situation, we will connect two network cables to one outlet.
And the network of a large company, where network cabinets are used and the network connection is carried out as follows. The computer is connected to a network outlet, the cable from the outlet goes into the network cabinet and is connected to the patch panel, and from the patch panel it is connected to the switch. Here we will also connect two network cables to one outlet.
But we can do all this by simply changing the connection diagram, or rather by re-crimping the network connectors according to a new scheme.
We will go from simple to complex, so we’ll start with the basics, and specifically with the home network.
As you hope you know, the network cable is crimped according to two standards, standard A and standard B, the vast majority uses standard B, personally, I only once encountered crimping according to standard A, but more on that later. This diagram shows a cable crimped according to standard B and according to this diagram the computer is connected to a network device.
Network cable crimping diagram for home network
In order to connect two computers, we must crimp 2 cables and connect them to the devices. But, as a rule, no one wants to carry out installation work and lay an additional cable, and in this situation we can simply re-crimp the existing cable in order to connect two devices to our network.
The fact is that in networks with speeds of up to 100 megabits, only 4 wires are used to transmit signals, these are 1-2-3 and 6, therefore, we are left with 4 unused ones, which we will use to implement the task. We'll just connect the 4 unused wires to the second connector, the result should look something like this! By the way, in I told you how to restore the network using the same principle if one of the wires was broken!
If your Internet provider installed a cable at home, then most likely they installed a cable with 4 cores, since this cable is cheaper and in this situation our system will not help, since you need a cable with 8 cores.
On both sides, we crimp the connectors according to this diagram and connect them to computers and a switch (router). By the way, most likely the devices will not be close, so you will need to either cut the cable further or twist it, although this is not recommended.
Network cable crimping diagram for small office
Here we crimp the cable from the switch side, as shown in the first example, and from the socket side we crimp the connector, which will be connected to the socket in such a way that 2 cables come out of it, as shown here. The wires here are small, since I made a patch cord here to connect between the patch panel and the switch, but the meaning is the same. In addition, you should know approximately the length of the cable that will be needed to connect the device.
By the way, when preparing the cable, it is advisable to immediately cut off the unused wires on both sides, so as not to confuse the connection diagram later.
Network cable crimping diagram for a large company
Here I will look at the example of a network diagram that we implemented in
The logic here is exactly the same, only here we need 2 patch cords, one will also connect to the computers and the outlet, and the second between the patch panel and the switch.
It is also worth immediately adding the changes made to the cross-connection table.
Today there are two types of Internet connections. The first type is a wired connection, using a cable called twisted pair for connection. The second type is a Wi-Fi connection, which provides an Internet connection using radio waves. Wi-Fi connection has become widespread nowadays. However, wired Internet has a number of advantages that are relevant in large organizations and offices. At home, it also makes sense to make a wired connection to at least one computer. For a stable Internet connection and efficient operation, you must correctly configure its connection parameters.
Benefits of a wired Internet connection
Over the past 15 years, the Internet has rapidly penetrated into all areas of our lives. It is necessary in banking, trade, manufacturing, and is also indispensable for the exchange of information and personal communication. The most common methods of connecting to the global network today are a wired connection and a Wi-Fi connection.
For a wired connection, an optical cable or twisted pair is used. The first type of cable has a significant advantage, as it provides information transmission speeds of up to 1 GB per second. Over twisted pair cable the maximum speed reaches 100 MB per second.
The speed of information transfer through the cable depends on its type and on the network card that receives the signal. This affects the operation of desktop computers, game consoles, televisions and other devices connected to the same network. Streaming information does not require constant exchange between devices, which significantly increases processing speed. The speed of the local connection between workstations is of great importance when working on a corporate network. This is taken into account if there is a need to quickly transfer a large amount of information.
With a Wi-Fi connection, the connection to the Internet is made using radio waves operating in a certain range. Therefore, Wi-Fi is more in demand at the household level. It is convenient because it allows you to immediately connect to the Internet from a smartphone, tablet or laptop anywhere there is an access point. However, signal reception is affected by neighboring devices operating in the Wi-Fi connection frequency band, and by objects in the path of radio waves.
A Wi-Fi connection does not require cables, but it is highly susceptible to radio interference, and the further you are from the access point, the worse the signal reception
A wired connection has a number of advantages over a wireless one:
- the speed of receiving and sending information with a wired connection is approximately 2 times higher than that of Wi-Fi;
- when exchanging files with the server, the delay is minimal, which is important in online games that require maximum speed of action from the user;
- a wired connection is more resistant to network interference; it is not affected by gadgets operating on the Wi-Fi frequency band or nearby sources of electromagnetic radiation;
- The signal strength during a wired connection does not depend on obstacles in the path and the influence of external factors.
Errors that occur when connecting a wired connection may be indicated by codes that indicate the cause of the problem.
Video: why a wired Internet connection is better than Wi-Fi
How to connect a cable to a computer or laptop
Even an untrained user can connect an Internet cable to the computer’s network adapter connector on his own. For connection, a standard cable (twisted pair) with crimped RJ-45 connectors on both ends of the cable is used.
You can connect the cable as follows:
- Prepare a network cable of the required length.
- Connect one connector to any LAN connector on the router.
First, connect the cable connector to any LAN connector of the router
- Connect the other connector of the cable to the connector of your laptop or computer.
Now you need to connect the second connector of the cable to the LAN connector of the computer
- When using an older type of modem, connect the incoming cable from your provider to the yellow Internet connector on the modem.
In older type modems, the provider cable should be connected to the yellow connector of the modem
- Connect the connecting LAN cable to any Ethernet connector of the modem and the network connector of the device.
The connecting cable from the device must be connected to the Ethernet connector of the modem
- After connecting the computer to the router, the indicator LED on the latter will light up, indicating that communication between the devices has been established.
When connecting to a computer, the indicator LED on the router's display panel will light up
Connecting the cable is not very difficult, since all connectors have connectors that fit only into the corresponding sockets on the computer's connector panel. Making a mistake in this process is extremely difficult even for a novice user.
Dynamic and static Internet connection
After connecting the cable connectors and building a connection between the computer’s network adapter and the provider’s equipment, you can debug the Internet connection. First of all, you need to choose a method of connecting to the backbone network, based on specific goals. There are 2 connection methods:
- A dynamic connection is a method in which an individual IP address assigned to a computer is configured automatically and changes when the initial parameters are transformed. The provider company’s equipment independently assigns the network address and default gateway to the computer. When a computer is connected to the main line, the connection to the global network occurs immediately, without requiring additional identification data from the user. The only inconvenience with such a connection is the possible representation of a remote connection to your address. In this case, you must first connect to the trunk line directly, bypassing the router;
- A static connection is a connection method where the individual IP address provided to the computer remains constant and is designated when concluding an agreement with the provider company. During such a connection, the user sets the address manually, and also independently enters the values of the default gateway and DNS servers. If such information is not in the contract, you can find it out in the technical support department of the provider company. Some ISPs may require you to enter a username and password for online licensing. This information is usually indicated in contractual documents or determined by the subscriber independently.
How to create a dynamic connection
To correctly create a dynamic connection, you must perform a number of sequential steps:
From the Start key menu, go to Network Connections
- In the “Settings” section that opens, in the “Changing network settings” block, select “Configure adapter settings.”
In "Options" go to the option "Configure adapter settings"
- In the Network Connections console, right-click the Ethernet connection.
- In the menu that opens, select “Properties”.
From the Ethernet connection drop-down menu, select Properties
- In the Connectivity Console, highlight the IP version 4 (TCP/IPv4) component and click Properties.
In the properties panel, you need to highlight the line IP version 4 (TCP/IPv4), and then open “Properties”
- In the TCP/IPv4 protocol attributes console, enable the “Obtain an IP address automatically” and “Obtain a DNS server address automatically” radio buttons.
In the last step, activate the switches “Obtain an IP address automatically” and “Obtain a DNS server address automatically”
- Click OK to complete.
The dynamic connection is now ready for use.
How to create a static connection
To create a static connection, you need to follow these steps:

That's it, the static connection is established.
Currently, most home Internet subscribers use a dynamic connection, since the main method is to connect through a router. A static connection is used for a modem connection or a direct connection.
When using an ADSL modem connection, only static addresses assigned by your ISP are used.
Video: Creating a Static and Dynamic Connection
How to set up an L2TP connection in Windows 10
The L2TP tunnel protocol, used to connect to the global network, is a symbiosis of the old PPTP protocols from Microsoft and L2F from Cisco. It is easily processed by network devices and has a high speed of information exchange due to reduced processor load. It has great connection stability and high security. Capable of creating tunnels to work in any network. The L2TP protocol is usually used in corporate networks, as it allows you to create a network connection over an existing network. This ensures a stable connection between the organization's main office and regional offices.
To set up an L2TP connection, you need to perform a number of sequential steps:
- Right-click on the Start icon.
- In the menu that appears, click on the “Network connections” line.
From the Start menu, select Network Connections
- In the Settings section that opens, select Network and Sharing Center.
In Settings, open Network and Sharing Center
- Here, select the “Create a new connection or network” option.
In the menu of the “Network and Sharing Center” section, you must select the first item - “Create a new connection or network”
- In the “Configure a connection or network” panel, highlight the line “Connect to a workstation” and click “Next”.
Highlight the line “Connect to a workplace”, then click “Next”
- In the Desktop Connection console, select the Use my Internet connection (VPN) tab.
Click on the “Use my Internet connection (VPN)” tab to continue setting up
- In the console that opens, enter the server address, check the box next to the option “Allow other users to use this connection” and click “Create”.
Enter the server address and don't forget to check the last box to allow other users to use the connection
- In the console that opens, enter your username and password, then connect to the backbone network.
- Go to "Network Connections".
- Right-click on the generated VPN connection.
- Select "Properties" from the menu that opens.
In the console, right-click on the generated VPN connection and go to “Properties”
- In the “VPN connection: properties” console tabs, open the “Security” option.
- In the "VPN Type" field, set the value to L2TP with IPsec (L2TP/IPsec), and in the "Data Encryption" field, select "optional." After that, open "Advanced options".
The VPN type must be set to L2TP with IPsec (L2TP/IPsec), select “optional” for data encryption
- Enter the key provided by your ISP for authentication.
The authentication key must be provided to you by your ISP
- Click OK to complete.
If you did everything correctly, then the L2TP connection is ready for use.
Video: how to set up an L2TP connection in Windows 10
The created L2TP connection increases the level of security for the subscriber and makes it easier to connect to the provider’s equipment.
How to set up a PPPoE connection in Windows 10
The PPPoE Internet protocol is used when connecting to a backbone network using Ethernet technology. This method has a number of advantages, for example, an expanded range of additional capabilities, compression of information during transmission, and carrying out authentication and encryption operations with information packets. Connection requires authorization on the network (entering a username and password). Used for direct connection to the backbone network and provider equipment.
To connect to the Internet using the PPPoE protocol, you must perform a number of operations:
- Open Network and Sharing Center.
- Here, select “Create and configure a new connection or network.”
In the “Network and Sharing Center” section, click on “Create and configure a new connection or network”
- In the “Setting up a connection or network” console, highlight “Internet Connection” and click “Next”.
Select the first item - “Internet Connection” and click “Next” for further settings
- Select the "High Speed (with PPPoE)" tab.
In "Internet Connection" select the connection "High Speed (with PPPoE)"
- Next, enter the username and password received from the provider and click “Connect”.
Enter the username and password received from the provider and click “Connect” to complete the setup
You now have a PPPoE connection established.
Video: how to connect and configure a PPPoE connection
Giving permission to other users to use the connection is only worth it when installing home Internet, since the number of users is limited.
Ways to troubleshoot wired Internet connection problems
When connecting to the wired Internet, errors periodically occur due to equipment malfunctions, a break in the backbone network, or incorrect user actions. In most cases, connection problems arise due to careless actions of the user himself.. To determine and eliminate the cause of the problem, you need to follow simple steps according to the following algorithm:
- Launch Network and Sharing Center.
- In the Network Connections tab, select Troubleshooting.
Go to the Network and Sharing Center and open the Troubleshooting section
- Select "Internet Connections".
For further settings, select the "Internet Connections" option
- Next, click on the line “Run the troubleshooter.”
Wait for the problem detection process to complete
- After the process is completed, in the window that appears, select the “Troubleshoot Internet Connection” tab.
Select "Troubleshoot Internet Connection Problems" and wait for the diagnostic process to complete
- At the end of the troubleshooting process, close the console if no problems are identified. If problems are found, follow the further instructions in the pop-up windows.
- In the next step, under Troubleshooting, open Incoming Connections.
Run the troubleshooter by clicking on the appropriate line
- Once the verification process is complete, in the Incoming Connections console, select Find this computer on the network and click Next.
Check "Find this computer on the network" and continue troubleshooting using the "Next" button
- During the troubleshooting process, follow the instructions that appear on the console.
- If no problems are found, close the console.
- If problems are found, follow the program instructions to fix them.
This completes checking incoming connections.
The following instructions show how to detect one incoming connection problem. You can find out more about the problem by clicking on the “View additional information” line.

The above method of searching for connection errors is classic and was developed by Microsoft Corporation specialists. In reality, everything can be much simpler, since a problem with the Internet connection can be caused by other reasons that can be eliminated mechanically.
This algorithm helps to resolve the problem of lack of Internet connection in most cases:
- Restart your computer.
- Unplug your router and wait 10-15 seconds.
- Turn on your router.
- If the connection is not restored, click on the Reset button to reboot the router.
To avoid problems with your Internet connection, it is recommended to periodically disconnect your router from the network and give it time to recover.
Video: troubleshooting errors when connecting to wired Internet
Currently, all Internet providers prefer to establish a dynamic connection to the backbone network. This is more convenient for the network subscriber and for the provider company, since it does not require reconfiguring parameters in case of any changes in the network equipment. If you plan to frequently use remote access to your computer, then it is certainly better to choose a direct connection, bypassing a router or modem. For home Internet, you can always change the router settings and connection type initially set by the provider’s specialists. In the future, when the system configuration is changed or a complete reinstallation, the network parameters are set automatically. When connecting directly, the settings will need to be set manually. All this must be taken into account by users when choosing the type of Internet connection.
Share with your friends!