How to send a shortcut to your favorite webpage to your desktop in Android. How to make a blacklist on Android Possible problems and ways to solve them
If you have just now decided to switch from a push-button mobile phone to a smartphone running Android, then some difficulties await you. It is quite possible that at first you will be thinking about how to install the program. Of course, you can limit yourself to pre-installed applications. But quickly enough you will exhaust their potential, you will want more. Therefore, we recommend that you read this article - it describes all the methods for installing applications.
Even at the dawn of its operating system, Google tried to make it easier to install additional applications. For this purpose, the American giant created a separate online store, called Google Play. It can be accessed using the program Play Market, which is available on almost every smartphone running Android. It is not available only on the cheapest devices from nameless Chinese companies that have not undergone special testing and licensing.
To access the online store you will also need Google account. Creating it will not be difficult, as you will see if you read our separate material. It is recommended to use the same account on different smartphones; in this case, it will be much easier to find and install your favorite applications.
Installing the application on Android via Google Play is very simple. To do this, do the following:
Step 1. Go to Play Market. You will find the icon of this client on the desktop or, as a last resort, in the menu.
Step 2. You will be taken to the Google Play home page. You can try to find the application you are interested in using it, or use the search bar located at the very top.

Step 3. When you get to the program or game page, click on the green button “ Install" The download process will begin immediately, after which the installation will begin. If you are going to install the game, you may be offered to download it via Wi-Fi to save traffic. Whether you agree with this is up to you to decide.

Using a computer and its browser
Not everyone knows about this, but Google Play supports remote installation of programs and games. This means that you do not have to access the online store from the exact smartphone or tablet on which the application you need will be installed. You can use a computer instead. It doesn’t matter which operating system is installed on it - Windows, Mac OS or Chrome OS. You just need to have an Internet browser on your PC. With its help you must do the following:

Step 8 Go to the folder " Downloads"(Download).

Step 9 Click on the APK file.
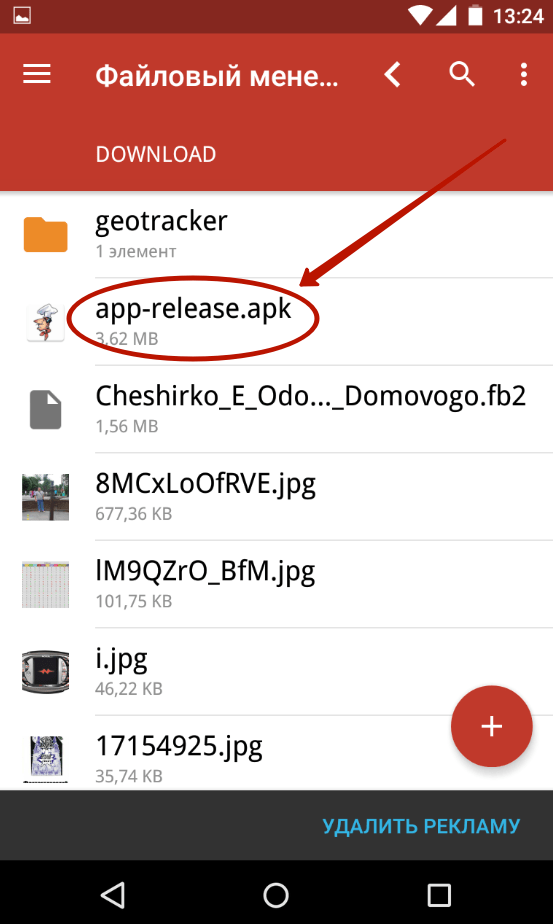
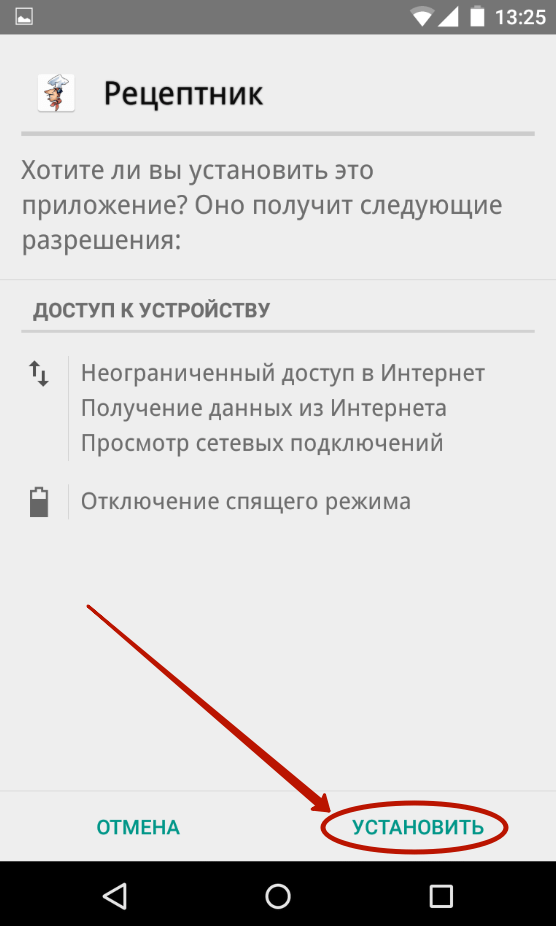
Step 10 Click on the button Install" Grant the app all permissions if it requires it.
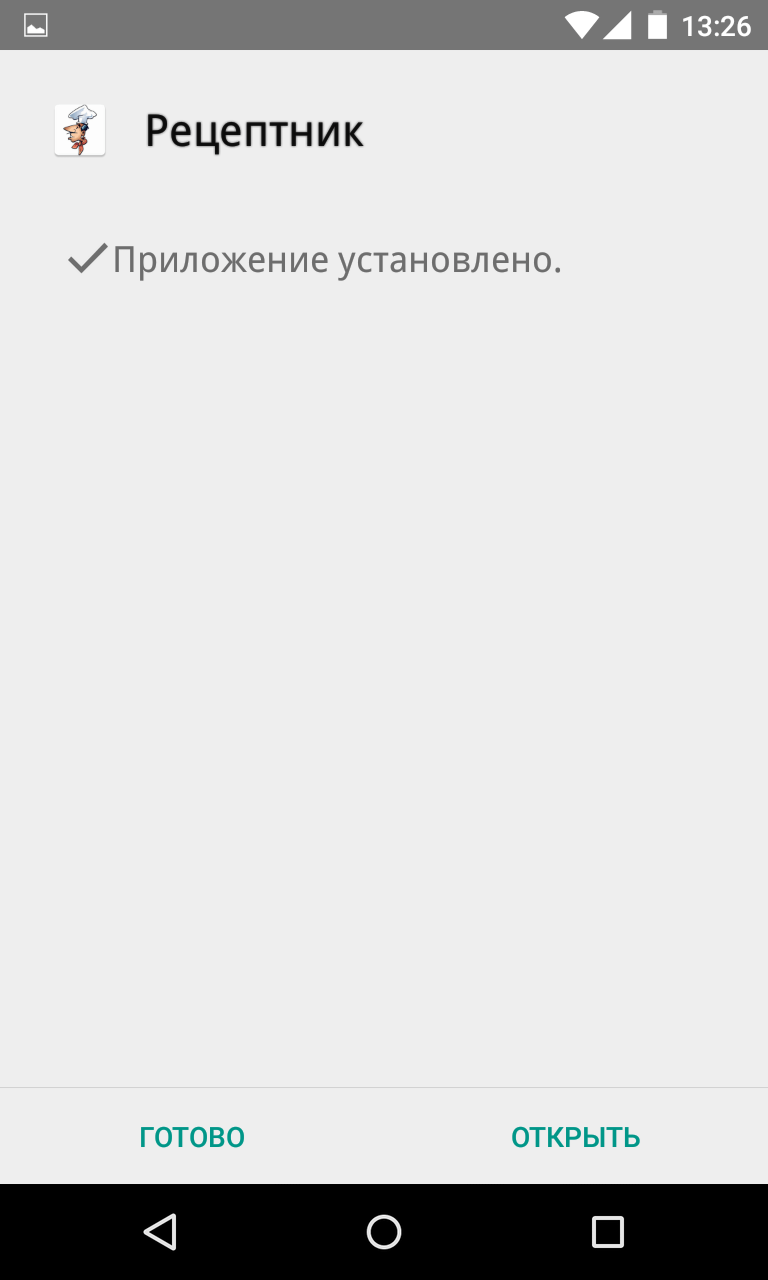
This completes the installation. The icon will not appear on the desktop - you will have to look for it in the menu. Regarding the APK file in the " Downloads", then it can now be deleted.
Using a card reader and other methods
If the USB connection does not suit you, then you can use other methods to transfer the APK file. For example, you can remove the memory card from the device and insert it into the card reader. If you have it, then you should be able to use it, and therefore we will not describe the entire procedure.
You can also use a wireless connection. For example, the application is ideal for these purposes Airdroid, which is distributed on Google Play completely free of charge. You can read about this and other methods of connecting to a computer in the article “ How to sync Android with PC ».
Installing an application on a memory card
If you have a memory card installed, then many applications will automatically be installed on it. The exception is special utilities that should be located only in the built-in memory.
You can move applications to the SD card at any time. This is done as follows:
Step 1. Go to " Settings».

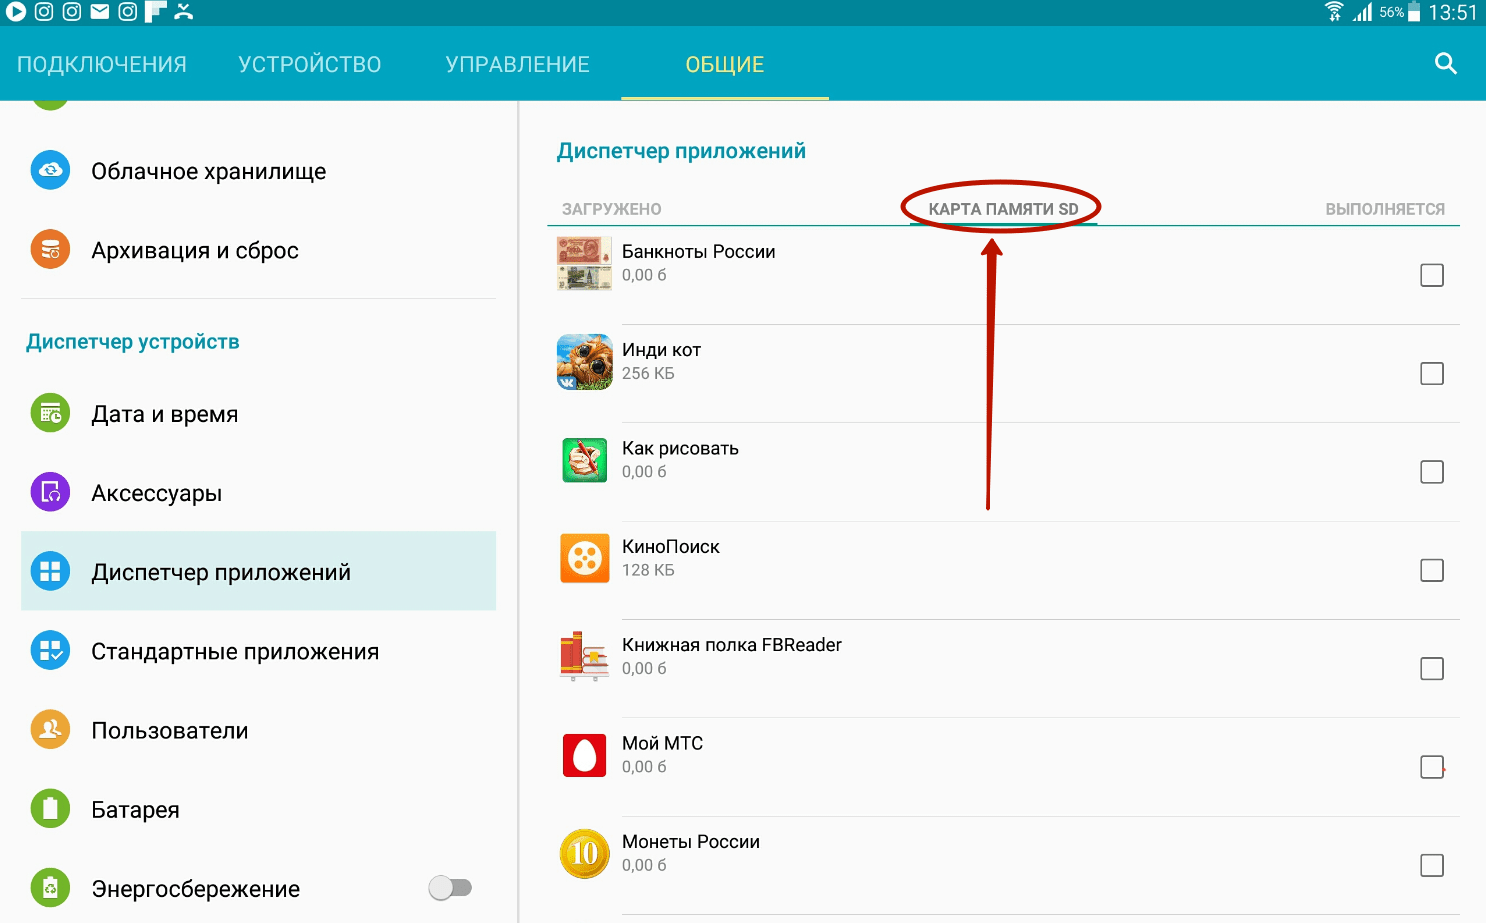
Step 2. Go to the section " Application Manager" It may also be called " Applications" If you have a tablet, you must first go to the “ Are common».

Step 3. Go to the " SD memory card" All programs and games that can be moved to external memory are displayed here.
Step 4. Click on the application you want to move. In the menu that opens, click on the button " To SD memory card" It may also be called " To SD card».
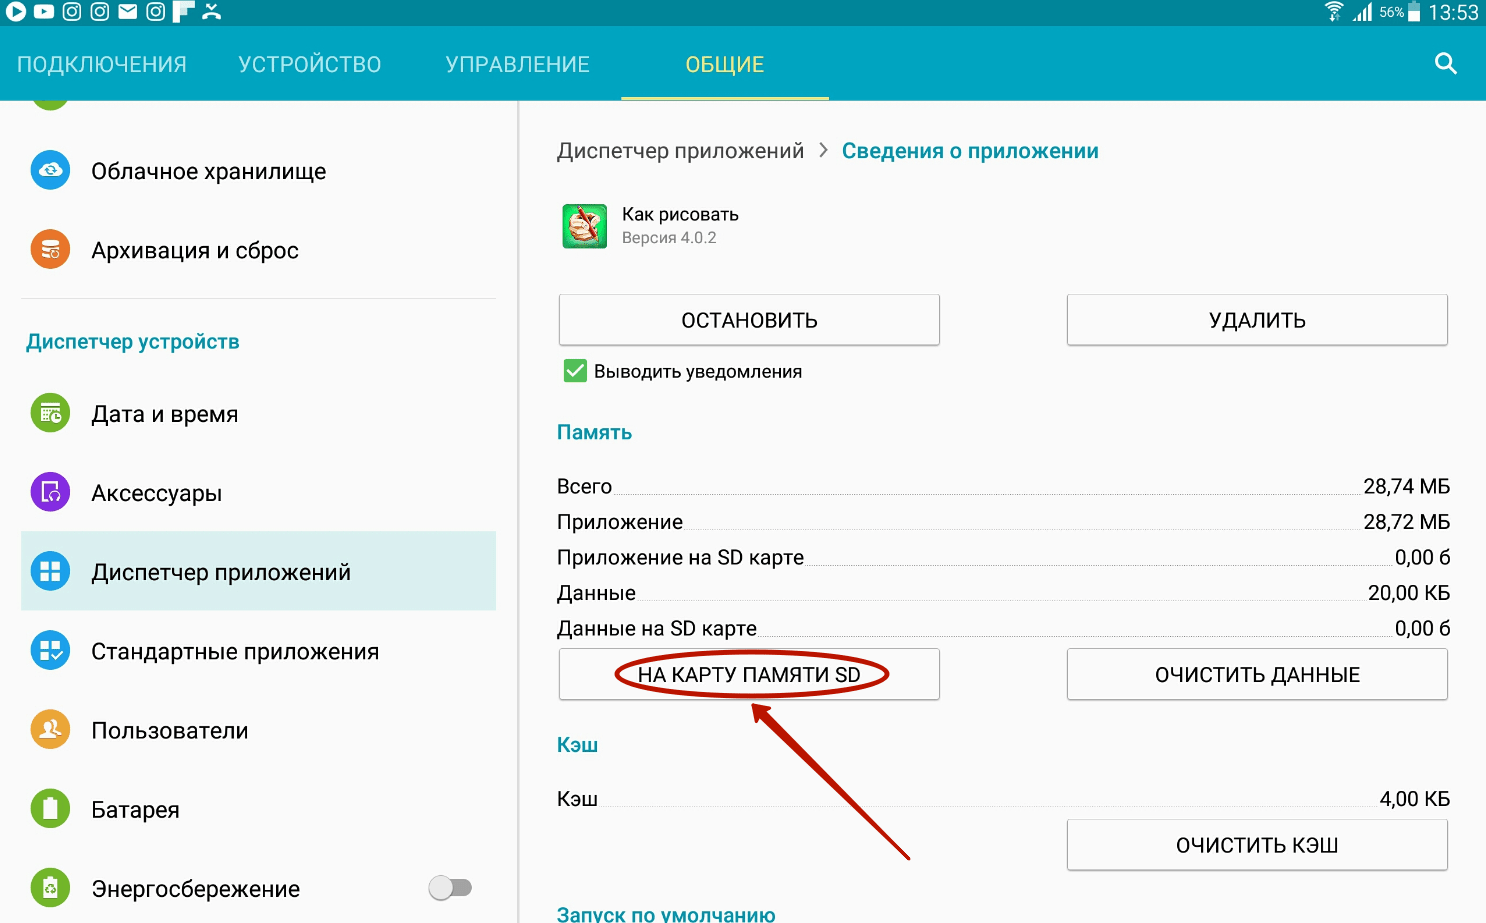
All we have to do is wait for the result!
After many years of living on Android, I collected some material for myself about this OS. Today I want to summarize the answers to the simplest but most pressing questions about Android. I'll be glad if it's useful to anyone. On vacation or traveling, the phone is very helpful and should work at 100. The post is not intended for an advanced user, but rather is useful as a list of high-quality applications and simple tips for the inexperienced owner of a smartphone or tablet on the Android operating system.
How to set a ringtone on Android
Many ways. For example, in the Music application, select a track. A long press on the line with the name of the composition brings up a menu where there is an item “Put on call”.
Howon Android transfer the application to the memory card
I still do this using my favorite package. “Toolkit” menu, “App2SD” tab.
Howon Android take a screenshot
I went through many applications, but from those that do not require root to take screenshots, I chose the “ ” application.
The application is simple and allows you to take a “photo” of the screen in two ways: by clicking on the camera icon in the upper left corner of the screen or by pressing the hardware power and volume keys. The second option was unusual at first, but now everything is fine - I’m used to it. You can select your folder to save screenshots and preview the image before saving. The main thing is that without root, without advertising, free and with customizable save folder and preview.
How to install applications on a memory card on Android
Go to the settings menu - “Options”, submenu “Memory”. You should specify the SD card as the default recording disk. Applications, by default, will be installed on the memory card (those that can be installed there). You can check it through Android Assistant. I wrote in more detail about how to clear the phone’s memory in the post ““.
On the screen when the camera is on, you will immediately see the difference in the number of available shots.
How to add a photo to a contact on Android
Simple again. First you need to open the contact for editing. Select a contact in your address book and press.
Option 1. In the contact that opens, click on the silhouette of a person on a gray background. You will be able to select a photo from the gallery or take a photo using the device's camera.
Option 2. Press the “Settings” button and select “Change” in the menu that appears. Next, do according to the first option.
How to add a number to the blacklist on Android
Select a contact. Press the “Settings” button and select “Direct blocking” in the menu that appears. Checking the box blocks calls from this subscriber.
I use dr.Web antivirus, so I solve this issue using the blocker built into this product, which allows you to block calls and SMS. It blocks SMS by the number from which the message came, by keyword, and calls by contacts, call log.
That's all for today, but I will continue to talk about simple solutions for Android.
Dear friends! Beginner users of mobile devices on Android OS!
Some of you sometimes have a question. So you often open some pages in the browser and after turning on your smartphone you want speed up the process of opening these pages as much as possible. Instead of:
1 - find the browser icon on desktops (there are usually many of them)
2 - open browser
3 - find the list of Bookmarks through the browser menu
4 - find the bookmark for the page you need in the list and tap on it,
would you like to have one like this bookmark directly on the desktop and reduce the whole matter to one single tap on it. The Android system has such an opportunity.
Create a bookmark(shortcut) to your favorite page on your desktop is very simple. Let's consider two options this: when using the standard Android browser and when using another browser (using the example of my favorite UC Browser).
IN first case to create a shortcut you need (screenshots are shown for Android OS version 4.2.2):
- Launch the standard Android browser
- Open your favorite page, the bookmark of which should be placed on the desktop (in the example, this is the main page of the Yandex search engine)
- Press “Menu” (left soft key of the smartphone)
- Select "Add link"
- That's it, a shortcut on the desktop.


IN UC Browser you need (it may be different in different browsers, but the idea is general):
- Having opened the page, use the menu to create it as a Bookmark in the browser
- Press "Menu"
- Select "Bookmarks"
- Long tap on the desired bookmark and select “Send” in the menu that appears. to main screen"
- Next you can change the shortcut name
- That's all. The shortcut is again on the table (in the screenshot it’s the second one, now created in UC Browser).


Now the procedure for opening your favorite page is simplified and accelerated as much as possible. These icons allow you to navigate to the desired address with one click. In this case, the page opens in the browser selected by default in the system.
Good luck to you, see you again on the pages of the site.
To keep up to date with new products on the site, I recommend subscribing to the periodic weekly mailing “Tales of the Old User” on the Subscribe.ru portal.
Communication via smartphones occurs in our lives every day. Calls and messages arrive on the phone in huge quantities. But they do not always provide necessary, interesting and pleasant information. If you want to protect yourself from these types of calls, use the so-called black list in the Android OS.
What is a “black list” and why is it needed?
“Black list” - the ability to restrict calls and messages from certain subscribers. You can create such a list in two ways: through a special application or directly using the functionality of your smartphone.
The “black list” works according to this model: SMS are sent to your phone, but you do not receive them as usual. The system blocks them and deletes them. A similar algorithm is used to filter calls from other subscribers when the contact is on the “black list”. The call will be blocked and placed in the log. As a result, the number will be reset automatically.
How to add contacts to the “black list”
If you do not want to load the memory of your gadget by installing third-party programs for blocking calls, then you can use the option provided by the developers in Android.
The procedure for adding a contact to the blacklist differs depending on the installed version of Android.
"Blacklist" on Android versions up to 4.0
Those users whose version of the Android platform is not the latest (from version 2.3 to version 4.0), you need to use the following procedure:

"Blacklist" on Android versions 4.0 and higher

Video: how to add a number to the blacklist on a smartphone with Android OS
Adding a contact to the “black list” using programs

Removal from the “black list”
To remove from the list, you need to open the “Menu” of the same contact and click the “Remove from black list” line.
 To unblock a contact, click “Remove from blacklist”
 Depending on the manufacturer and version of Android, some features may not be available.
The menu in contact settings does not appear
Smartphones version 4.0 and higher may not have the function of adding a number to the “black list” using Android capabilities.
 Some versions do not have the ability to add to the “black list” through “Contacts”
 To solve this problem, you need to transfer the contact from the SIM card to the phone memory.

Video: how to transfer contacts from a SIM card to your phone
The contact menu drops down, but the required function is missing
On versions of Android 5.0 and 6.0 from some manufacturers, the contact menu appears, but there is no “Block incoming calls” function. Instead, you need to click “Voicemail Only.”
 You can use Voicemail Only instead of Block Outgoing Calls
 Now, if the selected user calls, the line will always be busy for him.
Using the built-in functions of Android devices or third-party applications, you can limit the circle of people who can call, and thus get rid of information or intrusive calls that you don’t want to hear.
skesov.ru
Blacklist on Android
Hello, dear readers! Again, like a year ago, some dubious companies with Moscow and St. Petersburg numbers began to attack me with calls. This time they offer to make money on the stock markets. I am not interested in this in any way, which I politely informed the managers on the other end of the line.
But they, apparently, do not understand the Russian language, and continue to persistently pester me with their calls almost every day. Girls and young men with monotonous voices every time call me by my first name and patronymic and say memorized phrases that I have already learned by heart. My patience came to an end, and I decided to revive the blacklist on my phone again.

When I did this last year, no difficulties arose, since my old push-button Samsung had a built-in blacklist function.
Today I have an Android smartphone in my hands, which does not have such a function. But nevertheless, I found a way to add numbers that bothered me to the blacklist. I will share my experience in this short article.
How to add a number to the blacklist on an Android smartphone?
The method I used is suitable for any phone running on the Android operating system. All you need to do is download, install and configure the desired mobile application.
So, go to the Play Market and enter “black list” in the search.

There are several options for downloading, but I chose the application that had a higher rating.

Install the application and launch it.

Everything here is elementary. In the “Black List” tab, you can add as many numbers as you like from which you want to block calls. Moreover, you can add either by manually entering a number or by selecting from the list of contacts, calls or messages. It is possible to block numbers starting with certain numbers.

Be sure to select the “Black List” blocking mode. If you check “All numbers”, then no one will be able to call you.

A convenient feature is the blocking schedule. For example, every morning you are pestered with calls from Moscow numbers. Add all numbers starting with +7495 to the black list, indicate in the schedule from 06:00 to 09:00 and sleep peacefully.
In the “Log” tab you will see who tried to call you and when. In “Settings” you can choose what exactly to block: calls or SMS. If you need to block all hidden numbers, then check the corresponding box.

There are no unnecessary functions in the application, which is good news. Everything is intuitive. It remains to find out what the blocked subscriber will hear when trying to call.
By experience, I found out that the subscriber will hear one long beep, after which the call will be dropped, and either short beeps or an answering machine voice will appear in the handset: “Sorry, the subscriber is busy.” At this moment, a notification about the blocked call will be sent to your phone.
How to block an unwanted call on AndroidOne and Nexus phones
In “pure” Androids of the AndroidOne and Nexus series, everything happens simply. You just need to follow the steps sequentially:
- Open the menu and click the “Contacts” icon.
- Select from the list those numbers and those “clients” who will make up the phone’s blacklist.
- Next, click the button with the “Edit” (“Change”) function. Its usual location is the upper right corner, pencil icon.
- Then you need to click the vertical ellipsis. It is also located at the top right corner.
- In the submenu that appears, check the box next to “Voice mail only.”
- You can save changes by clicking on the check mark icon on the screen.
Now the selected subscriber will hear short beeps when dialing your number.

Options for creating a blacklist on Samsung (and other) smartphones with Android 5-6
There are no columns or “Voice mail only” functions in South Korean devices. In them, creating a blacklist on Android is somewhat different. To execute this scenario, you need to perform the following manipulations. After which you can create a list of unwanted subscribers in other smartphones from other manufacturers.
So, the steps:
- Click on the button labeled “Phone”.
- Select the “Journal” tab.
- Among the numbers displayed, click on the one you want to block.
- On the page that appears, we are interested in the “Functions” button. It can be indicated either in the form of a pencil or three vertical dots (all of which are located at the top right).
- In the submenu that appears, select the line “Blocking/Unblocking”.
- A pop-up window will immediately appear offering options for blocking calls and messages. After activating them, click “Yes”.
There is also an option to reject call signals and optimize Android. It “hides” in “Settings”. To get to the required function, you need to take the following steps:
- After clicking on the Call Settings context menu in the call log, go to Call Rejection.
- Next, click “Black List”, where the numbers will be displayed. By clicking on “+”, you just have to enter the number of the unwanted subscriber.
- Don't forget to save your settings.

Additional utilities for working with blacklists for Android phones
Using the built-in automatic creation of a blacklist has a significant inconvenience: the absence of any settings. In such cases, it is recommended to download and install special applications. The list of similar applications in the GooglePlay store is quite rich. The “Black List” program is considered the most rated. This utility allows you to block numbers from the phone book, from the call log and those entered manually.
After downloading this application, install it on your phone. Next on the list:
- We activate “Calls” and “SMS” in the main window.
- We select the method from where you can get the “subscriber” number by clicking “+” at the bottom right.
- By checking the box we add to the black list.
- Once again, click on the “tick” at the bottom of the screen.
- You can “open” a number by “stomping” on it and clicking “Delete”.
The program has extensive capabilities. It is free, effective, convenient and stops receiving calls and notifications, preventing them from becoming an eyesore and an eyesore to the owner of such a multifunctional device as a smartphone.
As you can see, creating a blacklist on an Android smartphone is not so difficult. In some cases it can be very useful.
I wish you pleasant communication! If you have any questions, ask them in the comments.
Best regards, Sergey Chesnokov
mobile-dom.ru
Where is the blacklist located in an Android phone/smartphone?
What is a phone blacklist? This is a special section where the user can add subscriber phone numbers. All incoming calls from numbers added to the emergency situation will be blocked by the system. A very convenient thing. But sometimes it becomes necessary to familiarize yourself with the numbers added to the emergency situation. So how do you find the blacklist on your phone? As you understand, it all depends on the specific firmware version installed on your smartphone. We will look at two devices - Samsung Galaxy with TouchWiz firmware and Meizu with Flyme firmware.
Where is the blacklist located in a Samsung phone?
Find the Settings icon on your desktop and click on it.

Here, find the “Challenges” section.

Then click on the “Reject Call” option.

Now - to the “Black List” item.

And here are the subscriber numbers added to the emergency situation.

Go to the Phone application. At the bottom of the screen, find a button in the form of three dots, click on it to display a menu.

Select “Settings” from the menu.


The next item is “Black list of users.”

The black list has opened. True, in our case it is empty.

In the same way, you can access the emergency on other devices, including Xiaomi, Lenovo, LF, Fly, Alacatel, etc.
androidnik.ru
How to blacklist a number on Android so they don't call
Why might you sometimes need to add a number to the blacklist on Android? Scenarios can be different - from a joke to a bloody persecution.
If your phone number falls into the wrong hands, you can get into a lot of trouble.
Fortunately, thanks to special Android programs and tools, such situations can be prevented.
Although each of them behaves differently, they all aim to create a call blacklist and both options are available for free.
Blacklist on Android will help you free yourself from burdensome individuals who are constantly trying to contact you.
NOTE: as for adding numbers to emergency situations using android tools, I will be based on versions of android 5.0 – 6.0.1 and a Samsung phone, so there may be some differences on others.
How to add a number to the blacklist using Android tools
To add a number to the blacklist of your Android phone, click on the phone icon and select “Options” at the top right.

Now let's go to settings.

In an open new tab, click on the blocking list line.

Now we either add the number manually, or add it from existing contacts, click on the plus sign and confirm “OK”.

This is all. The selected or dialed number is on the black list so that they no longer call you from it. To remove a contact, there is a minus sign opposite it - click and that’s it.
How to blacklist a number on Android using programs
If the first option did not work for adding a contact to the emergency situation (it didn’t work out or you couldn’t find the tools described above), then use the other one below.
There are many applications for Android that add numbers to the black list, I liked it called Black List.
Do you visit a certain website ten times a day? The long procedure of launching the browser and digging through bookmarks is already starting to get boring - we have a wonderful solution! Let's take your favorite site and put a shortcut on your Android desktop. After this, you will be able to open the desired web resource with one click on its icon (just like with applications).

So, first, we need the Google Chrome browser installed. Launch Chrome and go to the desired site. In the upper right corner, click on the three vertical dots - a drop-down menu list will open. Find the “Add to Home Screen” item and click on it. A small window will pop up before your eyes with the site name, description and the “Add” button at the bottom. Click on the button, voila - the site icon is now on our main desktop! Move it to the desired screen or position just like other icons.

Another little tip: before adding a tab to your desktop, you can rename it or, for example, remove an unnecessary description. To do this, simply click on the text and a keyboard for editing will appear. Enjoy! Also, we will be glad to hear from you in the comments.