How to set up a VPN connection in different versions of Windows. VPN - what is it and why is it needed? Description of the connection and setting up a free VPN server How to add a VPN connection
Virtual Private Networks are private remote networks, encrypted in special ways, with foreign servers. They provide connections at high speeds. They are used by Internet surfers to log in anonymously and visit blocked sites. Let's look at how to set up a VPN on Windows through different programs. This possibility exists even if it is not officially supported by the provider.
What is a VPN?
To configure it correctly, you need to understand the features and operating principles of the service. A VPN connection is a local network that connects several computers. The operating principle is based on a router that provides IP to all connected PCs.
Thus, it becomes almost impossible to determine the IP from which the user accesses the network, and it is possible to bypass most blocking programs. This occurs due to encrypted traffic packets, the keys for receiving which only the server has, from where requests are sent in the specified directions.
How to use on different Windows OS?
First you need to connect to the VPN server. This can be a home or remote PC. Providers that support such a service issue logins and passwords to their subscribers. In this case, the setup process is extremely simple. It is enough to fill in a few cells with the correct data.
Windows 7
This version is the most common. The question of how to set up a VPN on Windows 7 interests many. This is done through the control panel:
- At the top, change the images to "large icons".
- Find “network control center” - “new connection settings” - “connection to a workplace”.
- Two methods are offered - through direct dialing or a global network. You need the latter - it will allow you to learn more about VPN.
- Server details required. The myip website will help you determine your IP. Indicate any location – network performance does not depend on this information.
- Enter the login and password issued by your provider. When using your own server, the information is specified independently. Then you need to set “remember password” and save.
Detailed and step-by-step video instructions!
Now the connection will appear among the available ones. If there are several accounts on the computer, additional adjustments will be required through the control center. On the left you need to select “change adapter settings” so that a list of all available connections appears. Click "file" then "new incoming connection".
If there are several accounts, the system will prompt you to select a user. Having done this, click “add”. Then you will need a login, name (any name will do), password, and confirm the actions.
Now it remains:
- Select the connection option - via the Internet.
- Configure protocol – TCP\IP
- Click “properties”, allow access to callers, set IP. If this is not done automatically, register a random output of 192.168.200.1 to 192.168.200.100.
- Confirm the actions and click “allow access”.
These are the main steps of the procedure that can be followed on other versions of the OS.
The process is very simple and is carried out through the control panel. Once you click "Connection Wizard", select your private virtual network and follow the prompts. If your provider works with VPN, the name must correspond to that specified in the contract. Call the network home, work, like a PC.
Windows 8
The eighth version is automated, so the instructions on how to set up a VPN on Windows 8 are simple:
- At the bottom, find the corresponding icon that looks like a monitor.
- Find “Network Control Center” - “create and configure a connection” where the network parameters change.
- Confirm your PC's direct connection to the Internet.
- Specify the name of the work environment by changing the options. The same values are entered as for other OS versions.
The process completed successfully.
For those who find it difficult, watch the video instructions.
Windows 10
Here the procedure is different. It combines auto-tuning with user-specific settings. It is enough to know your login, password, and server address. The tenth version ensures stable operation of this service through providers that do not work with VPN. You need to download the appropriate program. It will be accepted and adapted by the OS.
Further actions:
- Start - Settings - Network and Internet. Select VPN from the list that appears on the left.
- Click + to add a new connection. Enter the parameters in the window that appears. They will be provided by the administrator or provider. Specify the provider, type of VPN, login information.
- Save the changes, return to the network management menu, click “change settings”. Select connection properties by right-clicking.
- Select the line IP version 4, then properties.
- Leave the general settings as default and click “advanced”. Remove the “use default gateway” market. Confirm.
A special icon will appear on the panel. Activation takes a few seconds and occurs without entering a login password.
Windows Vista
How to set up a VPN on Windows Vista? Through Start, enter the “Network and Sharing Center”, then “Establish a connection or network”. Next you are interested in “connecting to a workplace” - “use my connection”. They will offer to install or defer. Click the second option. Enter your login information.
To select a VPN, you just need to enter network connection management. You can also create a shortcut there.
VPN services
Many providers do not provide such a service, trying to control the location of subscribers and save transmitted information. Therefore, utilities that make it possible to use a VPN service based on an existing connection are very popular. They involve changing the IP address and transmitting data over an encrypted channel. Such services help to successfully bypass blocking by providing access to closed services. The utility can be installed on any OS, PC or smartphone.

There are many programs, among which it is worth highlighting several that are recognized as the best:
- ZenMate;
- ZenVPN;
- Spotflux.
ZenMate is a convenient extension for Chrome, Opera, Firefox browsers. This is a convenient service that is provided for free or for a fee. The speed depends on the selected service package. The extension pleases:
- stable connection;
- long test period;
- a wide list of countries;
- auto-tuning of parameters with the possibility of manual adjustment;
- using one subscription for different devices.
Hide.Me is an option that advanced Internet users will prefer. It can be precisely adjusted manually. There is limited and unlimited traffic. When choosing unlimited, 5 simultaneous connections are allocated - companies will appreciate this solution. This software is convenient:
- emergency disconnect option;
- free mode;
- expanded support for encryption protocols.
Beginners will prefer Hotspot Shield. It's a highly customizable option that installs and downloads automatically. It supports a stable, long-lasting connection and blocks ads for free. HTTPS encryption is offered, so the protection of personal data is ensured. Bypasses all restrictions set by the provider.

ZenVPN is suitable for those who prefer privacy when using the Internet. This utility is relatively free - only 250 MB per day is provided, if you need more, you will have to buy a special package.
Spotflux offers a secure internet connection. By choosing this software, you don't have to worry about security even while using Wi-Fi. An additional advantage is the compression of packet traffic, which allows you to save it if there are limits.
In the last few years, the technology of organizing a remote workplace (be it an individual employee or an entire office) through VPN technology has become increasingly popular. However, it is not very convenient for the user to manually initiate a VPN connection every time the computer boots. How to make it so that VPN connection was raised automatically when Windows booted or when the user logs into the system and would not require any additional manipulations from the user? Let's try to figure this out.
Let's assume that to connect to the VPN, you use a specially created connection called " vpn_office" If a new VPN was created with default settings, most likely its name will contain spaces or Russian characters (). For further work, it is better to rename it so that the VPN connection name contains only English characters and there are no spaces in the name (Right-click on the connection icon and “Rename”).
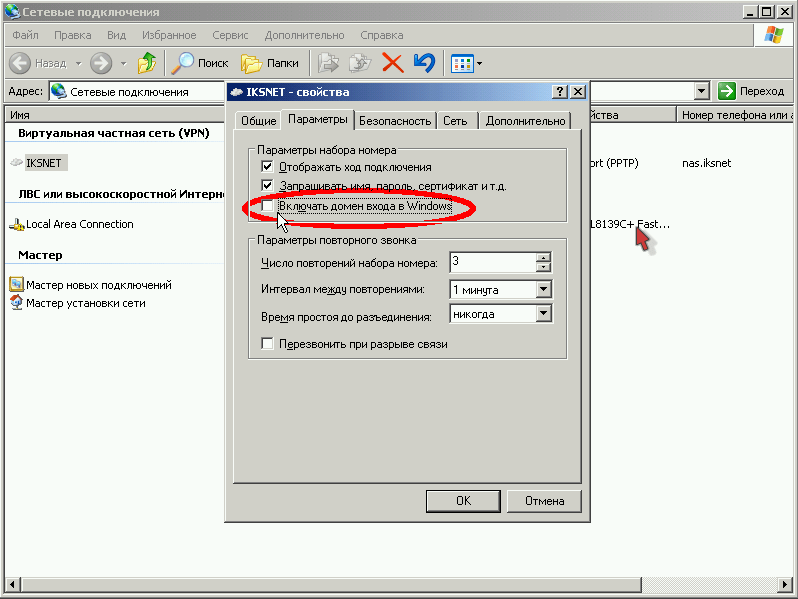
In the VPN connection settings, uncheck the following options:
- Display connection progress(Display progress while connecting)
- Request name, password, etc.(Prompt for name and password, certificate, etc)
- Enable login domain in Windows(Include Windows logon domain)

There are several ways to automatically establish a VPN connection in Windows. Most of them work correctly in almost all versions of Windows and differ in the way they implement the automatic launch of the VPN connection initiation script. In some cases, a particular technique may not work, and you will have to try an alternative. It is also worth noting that the described methods for automatically connecting to a VPN were tested in Windows 7, however, with minor modifications and edits (or none at all), they can be used in other operating systems of the Windows family
To establish an automatic VPN connection, we will use the utility built into the system rasdial.
RASDIAL. Setting up a VPN connection from the command line
Utility rasdial appeared in the earliest versions of Windows and was used to manage remote connections. You can find the rasdial.exe utility in the system directory C:\Windows\system32\.
A list of current remote connections can be displayed by typing the command rasdial without parameters .
To disconnect a remote connection, you need to use the command:
Rasdial "VPN_connection_name" /disconnect
In this case, we are interested in the process of how you can establish a VPN connection using this utility. The command format in this case will be like this:
Rasdial [VPN_connection_name] [user_name] [password]
[VPN_connection_name] - name of the VPN connection in the system
[username] [password] – information issued by your ISP or administrator.
If the connection name or user name contains a space, service or Russian characters, this parameter must be placed in quotes.
In my case, the connection command will be like this:
Rasdial vpn_office winitpro_admin $ecretnaRFr@z@

If the VPN connection is successfully established and authorization is completed, the line “ Commandcompletedsuccessfully", this means that the connection to the VPN server has been established.
The next step is to configure the automatic launch of this command.
Autostart VPN connection using Windows Scheduler
Let's try to configure VPN autostart using the Windows Task Sheduller functions. To do this, run the program Start->All Programs-> Accessories-> System Tools->Task Scheduler, or on the command line run: taskschd.msc
Let's create a new simple scheduler task named " AutoConnectVPN» 
- When the computer starts(when the computer boots)
- WhenIlogon(when user logs in)

The choice in this case is yours, because... Depending on your system requirements, sometimes you want the VPN to connect automatically when the computer boots (the user has not yet logged in). This is useful on servers (for services running in the background or for other automated operations). If you want the VPN to start only when the user logs in (the beginning of the working day of an operator or remote office employee), you need to select the second option.
Then we indicate that the scheduler should start the program (Start a program). 
In the next window you need to indicate which program you want to run and with what parameters. We are launching C:\Windows\system32\rasdial.exe with arguments vpn_office winitpro_admin $ecretnaRFr@z@

After the wizard finishes, in the list of tasks performed when Windows boots, another one with the name will appear AutoConnectVPN. Now the next time you boot the VPN system, the connection should pick up automatically.
ForWindows 7/Win 8. If the connection is not established, try to find the task you created in the task scheduler and in its properties on the General tab, specify - Run with highest privileges(run with administrator rights), this should help.
Autostart VPN using the registry
A VPN connection can be established automatically and using the registry. There is a special branch in the registry that Windows automatically launches programs every time it boots.

If you need to start a connection only for the current user, then this operation must be performed with the section HKEY_CURRENT_USER\Software\Microsoft\Windows\CurrentVersion\Run
Automatic VPN connection using startup
Simply create a shortcut for the desired VPN connection and copy (drag) the created shortcut to the Startup directory (C:\ProgramData\Microsoft\Windows\Start Menu\Programs\Startup) of the Start menu. 
Perhaps many readers will be outraged why the easiest way to automate the installation of a VPN connection comes last. However, I hasten to inform you that for some reason this technique does not always work in some cases, especially in an OS with UAC.
Autostart VPN using system service
This technique assumes that we will create our own Windows service, which processes the VPN connection procedure before the user logs into the system.
In the command line with administrator rights, create a new service with the command:
Sc create autoVPN start= auto binPath= "rasdial vpn_office winitpro_admin $ecretnaRFr@z@" DisplayName= "AutoVPN" depend= lanmanworkstation obj= "NT AUTHORITY\LocalService"
In order for the service to start after all system services have started, we will make it dependent on the service lanmanworkstation. In the console services.msc a new service should appear autoVPN, if it is missing, check the correctness of the entered command.
Please note that this is a pseudo-service and will not appear in processes, only running once at system startup.
You can remove the service with the command:
Sc delete autoVPN
In this article, we looked at the most popular ways to organize an automatic VPN connection in Windows. If something doesn’t work, or you know your own way of organizing VPN autostart, describe everything in the comments. The indicated circuit can be tested by lifting it and working out the entire procedure on it.
Good afternoon everyone! Today we will talk about how to set up a VPN (Virtual Private Network) in Windows XP, Windows Vista or Windows 7 and Lynix.
VPN stands for Virtual Private Network, which means “Virtual Private Network”. A VPN is created on top of an existing network, such as a regular local area network or the Internet, and can connect computers in different parts of the world into one logical network. Moreover, all data transmitted over such a network is usually encrypted to protect against unauthorized eavesdropping and interception. Thus, traffic encryption is one of the main advantages of using virtual private network technology. If computers are physically connected to each other by cable or radio waves (wi-fi), then their logical connection via VPN is only possible using special equipment called a VPN server. It could simply be a computer with special software. The VPN server manages the connection of other (regular) computers to the virtual network.
On a computer connecting to a virtual private network, a special VPN connection is configured, the configuration of which specifies the name of the VPN server and other parameters necessary for a successful connection. In each specific case, these parameters may vary, but the sequence of actions when creating a VPN connection is the same. We will look at it using the Windows Vista and Windows XP operating systems as an example.
Setting up a VPN connection in Windows XP
This section describes how to set up a VPN in Windows XP.
New Connection Wizard
Press the button "Start" in the lower left corner of the desktop, in the main menu of the system that appears, select the item "Control Panel", if your control panel looks like “XP Style” and you cannot find the icon "Network connections", go to the classic panel view by selecting the appropriate item on the left side of the window:
or select "Network connections" directly from the main menu "Start":

If you are seeing a Classic View window, look for the icon "Network connections" and open it, in the window that opens, find and run "New Connection Wizard":

In the first window, just click the button "Further":

In the second, select “Connect to the network at your workplace” and press the button "Further":

In the third select "Connect to a virtual private network" and press the button "Further":

In the fourth, in the free field, enter the name for your connection, for example, "Internet VPN" and press the button "Further":

On some computers where there are other connections, between step 4 and step 5 an additional window appears asking you to dial a number to connect. In this case, you need to stop dialing the number and go to step 5.
In the fifth window, enter the IP address of the default access gateway nas.iksnet(or nas3.iksnet for some subscribers) and click the “Next” button (note that there should not be any spaces or other invisible characters before or after the server name):

In the sixth, for ease of use, check the box “Add connection shortcut to desktop” and press the button "Ready":

Connection properties
After this, the connection window will immediately open; at the bottom of the window, find the button "Properties" and click on it:

Or click the button "Cancel" and having selected the connection, right-click on it and select "Properties":

In the window that opens, select the tab "Options", uncheck the item "Enable login domain in Windows":
In the "Security" tab, remove tick the item "Data encryption required" and click on the “OK” button:

On the tab "Options" you can check the box next to it “Call back when disconnected”, then, in case of an unexpected break, the connection will be restored on its own:


Let's connect:

Now in the field "User" You must enter your contract number ( for those subscribers who have a three-digit contract number, add “0” in front! For example, an agreement 111 typed as 0111 .), and in the field "Password", your access password to view statistics and mail from the contract. Please note that there should not be any extra spaces after the contract number in the “User” field.

After a successful connection, for ease of use, on the tab "Options" you can uncheck the box “Request name, password, certificate, etc.”, after this you will no longer be prompted for your username and password.
Saving your password
Attention: It is not recommended to save a password in the system, because the saved login and password can be stolen by spyware or your computer can be used to access the Internet in your absence.
Please note that access to the Internet is controlled by name and password, so take this moment more seriously. Do not disclose this data to strangers. If your password is too simple and short, in order to increase security, we suggest changing it. You can do this yourself, from your workplace, using the client part of the new calculation system, available at the link: Statistics. There you can change the password separately for entering the statistics page and separately for accessing the Internet. We hope that you can still find a lot of new, interesting and useful things there!
Note
When the VPN connection is disabled, you can still freely use the resources of the local network as before; a VPN connection is only needed to access the external network. If you have turned it off, be sure to turn it on to create a VPN connection. "LAN connection" otherwise the VPN connection will not be established.
Errors
Most often the system produces the following errors:

Error 619 or 734
- Occurs if you forgot to uncheck the “Required data encryption"In the connection properties, the "Security" tab.
Error 629
This error occurs if your login and password are already connected (remember if you didn’t let someone you know use your Internet), if not, then this connection is not broken on the server. To do this, wait 10 minutes, and try to connect again after this time... If nothing helps on the 3rd attempt, then I advise you to contact support.
Error 650
"The remote access server is not responding":
- The Internet access server is unavailable. Check whether “Local Area Connection” is enabled, whether the network card is working, whether the network cable is working, and whether a specific IP address is set in the IP connection settings.
Error 651 or 800
Your modem (or other device) reported an error" or "There is no connection with the VPN connection server"
- These errors may occur if you deleted or disabled the previous “Local Area Connection” connection.
- Or if you specified in step 5 wrong address. Check it, make sure the numbers are separated by periods and not commas.
- Firewall blocks outgoing requests for VPN connections.
- For some reason the request does not reach the server, i.e. Perhaps the gateway of your segment does not allow the request due to load or failure.
- The server sends a response stating that it is impossible to connect because... There are currently a large number of simultaneous connection attempts.
Possible fixes
- Check whether the local network is working at this point in time.
- Check the passage of the signal using the ping command to your gateway, and then to your authorization server.
- Correct a pair of keys in the registry or reinstall Windows
Error 678
"No response received"
- If it doesn’t help, try re-creating the VPN connection again (pay attention to the connection type, it should be PPTP, not PPPoE or L2TP).
- This error can also occur when negative balance your personal account.
Error 679
- This error occurs when the network adapter is disabled. You need to enable the network adapter by going to “START->Control Panel->System->Device Manager->Hardware”.
Error 691 or 718
"Wrong login or password"
- Check whether the login (contract number) is entered correctly. It must be 4 digits (three-digit contract numbers must be padded with a leading zero). Try typing your username and password again. When typing, make sure that the correct keyboard layout (typing language) is enabled and the Caps Lock indicator is on.
- Or if at the moment
- If the operating system does not prompt you to enter a username and password when connecting, then you need to do the following: Open the “Control Panel”, select “Network Connections”, right-click on your VPN connection and select “Properties” from the menu. The properties of the VPN connection will open. Now you need to go to the “Settings” tab and check the box next to “Request name, password, certificate, etc.” After this, confirm the changes by clicking the “OK” button. The next time you connect, you will be prompted for your username and password.
Error 711
This error occurs if a required service is not running on the computer. In this case, it is impossible to connect to the network, and in some cases, it is impossible to install network adapters. This issue may occur if some or all of the following services are not running.
- Plug and Play device support
- Automatic Remote Access Connection Manager
- Remote Access Connection Manager
- Telephony
To resolve this error, follow these steps for each of the services listed above.
- Open Administrative Tools by clicking Start, Control Panel, System and Maintenance, and Administrative Tools. Administrator permission is required Enter your administrator password or confirm your password if prompted.
- Double-click Services. Administrator permission required Enter your administrator password or confirm your password if prompted.
- Right-click one of the services above and then click Properties.
- On the General tab, in Startup Type, select Manual.
- Click Apply and then click Run.
Error 720
"Cannot connect to the remote computer."
This error occurs when the network protocol stack in Windows is damaged. You can check the integrity of the stack using the netdiag utility.
- Enter the command
- Netdiag will display test results for a number of network components, including Winsock. For more information about this check, run the netdiag command as follows:
- If Netdiag reports an error, you must restore the Winsock2 registry key.
- The easiest and fastest solution:
- After this, we restart the computer and set up a local network connection, since executing this command leads to overwriting the registry settings that are used by the TCP/IP protocol stack, which is equivalent to deleting it and reinstalling it. If necessary, recreate the VPN connection.
- If this does not help, then you can completely reinstall the TCP/IP stack like this:
- Delete the registry key with REG DELETE HKEY_LOCAL_MACHINE\System\CurrentControlSet\Services\Winsock
- Delete the registry key with REG DELETE HKEY_LOCAL_MACHINE\System\CurrentControlSet\Services\Winsock2
- Restart your computer
- Open the %winroot%\inf folder
- In it, find the file nettcpip.inf, make a backup copy of it and then open it in a text editor (for example Notepad).
- Find the lines in it:
- Correct them to:
- Save changes to nettcpip.inf file
- Open Network Connections and right-click on the property of the network connection we need, select Install->Protocol->Add. Next, select “have disk” and specify the path %winroot%\inf (usually this folder is hidden!)
- Select TCP/IP from the list. After this, you will again be taken to the network connection properties window, but for TCP/IP the Uninstall button will now be active.
- Select the TCP/IP protocol from the This connection uses the following items list and click the Uninstall button.
- Restart your computer
- Install the TCP/IP protocol similar to steps 2-5.
- If all of the above does not work, then look at the instructions at
Error 733
- Occurs if you forgot to uncheck all protocols except Internet Protocol And QoS.
Error 734
- Most likely you have a virus WIN32.Sality.
Error 735
- "The requested address was rejected by the server": Occurs if you entered IP address in "TCP/IP Properties"(it should be obtained automatically).
Errors 741 - 743
"Encryption settings are incorrectly configured"
- Go to the VPN connection settings, and in the “Security” tab, disable the “data encryption” item.
Error 764
"Smart card readers are not installed"
- This error occurs if you have configured your VPN connection incorrectly. Try removing it and setting it up again using these instructions.
Error 769
"The specified destination is unreachable"
- The error occurs due to a disabled local network connection or a missing physical link. It is recommended to check the status of the LAN (must be turned on) and the physical connection to the network (network cable must be connected).
- Sometimes it occurs if the router for some reason did not provide the correct IP address via DHCP
Error 781
"The encoding attempt failed because no valid certificate was found."
- Causes: The VPN client is trying to use the L2TP/IPSec protocol to connect.
- Tip: Go to VPN connection settings-Properties->Network->VPN Type and select PPTP VPN
Error 789
"Invalid VPN connection type selected"
- Go to the VPN connection settings and on the “Network” tab, from the “VPN Type” list, select “Automatic” or “PPTP”. Try connecting again.
- This error also occurs if you made a mistake when entering the IP address and enter commas instead of periods to separate octets.
Error 807
If you are using the “Automatic” VPN connection type, then try changing it to “PPTP”. In the properties of the network card you need to set Receive-Side Scaling State - disable and Receive Window Auto-Tuning Level - disable. It is also possible that the connection to the access server is blocked by a firewall. You can also recreate the VPN connection according to the instructions; if the problem is not solved, remove the KB958869 system update, or restore the system to an earlier state.
Error 809
Occurs when:
1 Using L2TP VPN connection type in Windows Vista and Windows 7 due to the connection being blocked by the Windows firewall. Solution: Change the VPN connection type to PPPtP. Enable the firewall rule "Routing and Remote Access (PPPtP)"
2 Blocked by your installed firewall or antivirus with firewall function Solution: Correctly configure your firewall.
Error 1717
"Unknown interface"
- Try restarting your computer
- If it doesn’t help, then run it from the command line (check the integrity of system files)
Setting up a VPN connection in Windows Vista/7
New Connection Wizard
Similar to setting up a VPN connection in Windows XP, run “Set up a connection or network” and select “VPN connection”:

Select creating a new connection and type PPTP, then press the button Further:
If you have not yet created a single VPN connection, then in the window that appears you need to select “Use my Internet connection (VPN)”

If connections have already been created in the system, then in the window that appears, select “No, create a new connection”

Fill in the field for the server address and check the box Don't connect now and press the button Further:

Enter in the field Username contract number, and in the field Password— password for the VPN connection (specified in Appendix No. 2 to the agreement as Password for viewing statistics, mail and VPN connection) and press the button Create:

VPN connection properties
After that, select “VPN connection properties” and correct in the marked places:

If you uncheck the “Request name, password, certificate, etc.” then when connecting, the computer will not display the connection window and request a login and password. If Windows forgets the login and password (and this happens), the connection will not be established. Error 691 will be displayed. In this case, the user will not be prompted to re-enter the login and password. What to do in this case.


The connection shortcut on the desktop in Windows Vista and 7 can be made as follows: Open the “Network and Sharing Center”, in the left column click the “Change adapter settings” link, in the window that opens you need to find your “VPN connection” (the name may be different, depending on how you specified the “Destination Name” during the setup process). Right-click on the connection and select “create shortcut”. By default, you will be asked to locate this shortcut on the desktop. Click “Yes”.
Errors
Error 609
This method of solving the problem does not always work.
- Launch Command Prompt (CMD) with Administrator rights
- Enter the following commands (removing miniport drivers):
- Now the next two (installing miniport drivers):
Error 619
"Port disabled"
Possible causes and solutions:
- Operating system problems. In this case, we recommend contacting specialists.
- The firewall is enabled. In this case, we recommend turning off the firewall.
Error 651
“Your modem (or other device) reported an error.”
Possible causes and solutions (in order of execution):
- Operating system crash. In this case, we recommend restarting your computer.
- The network card drivers are broken. We recommend reinstalling the drivers and reconfiguring the network.
- Problems with the OS. We recommend reinstalling the operating system.
- The network card is faulty. We recommend replacing the network card.
Error 678
"No response"
Often occurs when the MAC-IP binding is broken. In this case, the VPN servers and gateway are not pinged. In this case, it is recommended to call us and reset the MAC-IP binding.
The error may appear if you try to connect to a server that does not support the PPTP VPN protocol. We recommend reconfiguring the VPN connection using the auto-configurator or checking the settings manually.
Error 691 (Vista/7)
"Access is denied because this username and password are not allowed on this domain."
Appears in the following cases:
- Invalid login/password entered. Completely clear the login/password entry window and enter them again. The login must be 4-digit (three-digit contract numbers must be padded with a leading zero). When typing, make sure that the correct keyboard layout (typing language) is enabled and the Caps Lock indicator is on.
- The VPN session ended incorrectly (connection failure, abnormal computer shutdown). In this case, you need to wait a few minutes.
- Or if at the moment a connection has already been created with your username and password. (If you have more than one computer connected).
- Quite often it happens that Windows “forgets” the entered login and password and then they must be entered again, having first been erased from the input fields.
- If the operating system does not prompt you to enter a user name and password when connecting, then you must perform the following steps: Open the “Control Panel”, select “Network and Sharing Center”, in the left column click on the “Change adapter settings” link, right-click Click on your VPN connection and select “Properties” from the menu. The properties of the VPN connection will open. Now you need to go to the “Settings” tab and check the box next to “Request name, password, certificate, etc.” After this, confirm the changes by clicking the “OK” button. The next time you connect, you will be prompted for your username and password.
Error 711
run in the command line with Administrator rights:
Secedit /configure /cfg %windir%\inf\defltbase.inf /db defltbase.sdb /verbose
in order to launch the command line with administrator rights, you need to click the start menu, then in the run tab, type cmd in the English keyboard, an icon with the inscription cmd will appear in the menu, right-click on it and select “Run with administrator rights”
Error 814
"Base Ethernet connection not found"
- The error is caused by the network adapter used for this connection being unavailable.
Error 868
"DNS name not resolved"
- This error only occurs in Windows 7. The essence of the problem is that in some “builds” of this Windows the DNS client is unstable.
- Solution:
- Check that the DNS server addresses in the local network connection are obtained automatically (at the moment 10.0.1.5 and 192.168.2.1 should be issued)
- Disable the IPv6 protocol (or better yet, everything except IPv4) in the local network connection properties
- Set the access server address instead nas.iksnet in the form of an IP address (10.0.1.11 or 10.0.1.13 at the moment, but it’s better to check with the command
- In some cases, resetting directories helps: enter the commands in the command line
Setting up a VPN on Linux
Debian
First install the required package:
$ apt-get install pptp-linux
Then edit the file describing the network interfaces. Here's an example:
$ cat /etc/network/interfaces auto lo iface lo inet loopback auto eth0 ppp9 iface eth0 inet dhcp iface ppp9 inet ppp provider iksnet pre-up ip link set eth0 up
Then edit the file describing your VPN connection. It should be something like this:
$ cat /etc/ppp/peers/iksnet unit 9 lock noauth nobsdcomp nodeflate #mtu 1300 persist maxfail 3 lcp-echo-interval 60 lcp-echo-failure 4 pty "pptp nas.iksnet --nolaunchpppd --loglevel 0" name
After that, enter your credentials
$ cat /etc/ppp/chap-secrets And after that you can manually connect the VPN: $ifupppp9 And turn it off: $ifdownppp9 The connection can be checked using the command: $ ifconfig ppp9 ppp9 Link encap:Point-to-Point Protocol inet addr:89.113.252.65 P-t-P:10.0.1.11 Mask:255.255.255.255 UP POINTOPOINT RUNNING NOARP MULTICAST MTU:1450 Metric:1 RX packets:40 errors:0 dropped:0 overruns:0 frame:0 TX packets:418 errors:0 dropped:0 overruns:0 carrier:0 collisions:0 txqueuelen:3 RX bytes:7750 (7.5 KiB) TX bytes:1189 (1.1 KiB) Original article http://www.iksnet.ru/wiki/index.php/%D0%9D%D0%B0%D1%81%D1%82%D1%80%D0%BE%D0%B9%D0%BA %D0%B0_%D0%BF%D0%BE%D0%B4%D0%BA%D0%BB%D1%8E%D1%87%D0%B5%D0%BD%D0%B8%D1%8F_%D0 %BF%D0%BE_VPN A VPN service increases user privacy on the Internet by increasing the security of connections, which is especially important for insecure public networks. In addition, a VPN makes it difficult for online trackers to track user activity and allows you to visit sites that have regional restrictions. Requirements: Opera web browser 40 or higher. Make sure you disable other proxy services before using VPN in Opera. The "Bypass VPN in search engines by default" option will be enabled by default. You can disable it if you want to use VPN also in search engines Google, Yandex, etc. Opera 55 supports locations divided into regions: Europe, Asia and the USA. You can use the "Optimal location" mode to select the optimal server for performance. They have become commonplace. True, no one really thinks about what is behind the concept like “VPN, setup, use, etc.” Most users prefer not to delve into the jungle of computer terminology and use standard templates. But in vain. From knowledge about such connections, you can derive a lot of benefits, for example, increase traffic or connection speed, etc. Let's see what a connection to a virtual network actually is, using the example of the interaction of Windows operating systems on a desktop computer terminal and Android on a mobile device Let's start with the fact that VPN setup is impossible without the general principle of understanding the essence of the connection being created or used. To explain in simple words, such a network necessarily contains a so-called router (the same router), which provides computers or mobile devices trying to connect to an existing network with standard additional IP addresses for accessing the local network or the Internet. In this case, a virtual network in which there is an activated VPN connection setting accepts any device connected to it and is assigned a unique internal IP address. The range of such addresses in the usual standard is from zero to the value 255. What’s most interesting is that even when accessing the Internet, the external IP address of the device from which the request is made is not so easy to determine. There are several reasons for this, which will be discussed below. Almost all virtual networks using a wireless connection like Wi-Fi work on the same principle - assigning free IP addresses from the available range. It is not surprising that any mobile device can easily be connected to them (but only if it supports the appropriate connection protocols). However, today any smartphones or tablets based on the Android OS have in their functionality the option of connecting the same Wi-Fi. The network is detected automatically if the device is within its coverage area. The only thing you may need is to enter a password. The so-called “shared” ones do not require a password at all. In this case, you need to go to the main settings on your smartphone or tablet and activate the Wi-Fi connection. The system itself will determine the presence of radio modules at a distance of 100-300 meters from the device (it all depends on the model of the distribution router). Once the network is identified, a menu will be displayed with all available connections and their blocking indication. If the network has a padlock icon, it is password protected (however, this will be indicated initially in the message). If you know the password, enter it. In public networks, where login using a password is not provided, it is even simpler. Has the network been determined? All. Click on connection and use it. As is already clear, VPN configuration in this case is not required at all. It’s another matter when you need to use the settings of Windows or another operating system (even a mobile one) to create a connection or assign the status of a VPN distribution server to a computer terminal or laptop. With operating systems of the Windows family, not everything is as simple as most users think. Of course, they automatically recognize a network or connection via Wi-Fi, ADSL, or even a direct connection via an Ethernet network card (subject to the presence of installed equipment). The question is different: if the distributor is not a router, but a laptop or desktop computer, how to get out of this situation? Here you will have to delve into the VPN settings. Windows as an operating system is considered first. First you need to pay attention not even to the settings of the system itself, but to its accompanying components. True, when creating a connection or using it to the maximum, you will have to configure some protocols such as TCP/IP (IPv4, IPv6). If the provider does not provide such services automatically, you will have to make settings indicating previously received parameters. For example, when connecting automatically, the fields in the Internet browser properties for filling will be inactive (there will be a dot on the item “Obtain an IP address automatically”). That is why you do not have to enter the values of the subnet mask, gateway, DNS or WINS servers manually (especially for proxy servers). Regardless of whether the VPN is configured on an ASUS laptop or terminal (or any other device), access to the network is still common. To do it correctly, you need to go to its own menu. This can be done using any Internet browser, provided that the router is directly connected to a computer or laptop. In the address field, enter the value 192.168.1.1 (this corresponds to most models), after which you should activate the enable function (using the router parameters in advanced mode). Typically this line looks like WLAN Connection Type. VPN clients are quite specific programs that work like anonymous proxy servers that hide the true IP address of the user's computer when accessing a local network or the Internet. Actually, the use of programs of this type is reduced to almost complete automation. The VPN setting in this case, in general, is not important, since the application itself redirects requests from one server (mirror) to another. True, you will have to tinker a little with setting up such a client, especially if you want to make the maximum number of available connections in your home virtual network. Here you will have to choose between software products. And it should be noted that some applications, even the smallest in size, sometimes surpass the commercial products of many well-known brands, for which you also have to pay (by the way, a lot of money). It goes without saying that almost all of the above settings affect the TCP/IP protocol to one degree or another. Today nothing better has been invented for comfort. Even remote anonymous proxy servers or local data stores still use these settings. But you need to be careful with him. It is best to contact your provider or system administrator before changing settings. But one thing must be clearly remembered: even when setting the values manually, as a rule, the subnet mask has the sequence 255.255.255.0 (it can change), and all IP addresses begin with the values 192.168.0.X (the last letter can have from one to three characters ). However, all these are subtleties of computer technology. The same VPN client for Android can provide communication between multiple smart devices. But the biggest snag is whether it’s worth using such a connection on a mobile gadget. If you noticed, we didn’t go into too much technical detail. This is rather a descriptive instruction about general concepts. But even that simple example, I think, will help, so to speak, to understand the very essence of the issue. Moreover, with a clear understanding of it, the whole problem will be reduced only to the system settings, which will not affect a specific user in any way. But here you need to be very careful. Actually, for those who do not know what a VPN connection is, this will not help much. For more advanced users, it is worth saying that creating a virtual network using Windows OS’s own tools is not recommended. You can, of course, use the initial settings, however, as practice shows, it is better to have some additional client in stock, which will always be like an ace in the hole.


How to set up an Opera VPN connection on MacOS
Selecting VPN server location
What is VPN
The simplest VPN setup for Android


Creation on Windows
Main settings

Router settings

Using VPN Clients

What about TCP/IP?

Conclusion